Administering PeerIQ
The following section describes the Administration pages, which can be accessed only when using your Administrator account. These pages enable you to manage users, configure the connection to the broker, configure PeerIQ, and manage PeerIQ logs, and other diagnostic information.
The nine Administration pages are:
Broker Configuration Page
For information about the Broker Configuration page, see the section Setting Up Communication between the PMC and PeerIQ. The section first explains how the broker facilitates information exchange between PeerIQ and Peer Management Center, and then provides instructions on configuring a connection to the broker.
Email Configuration Page
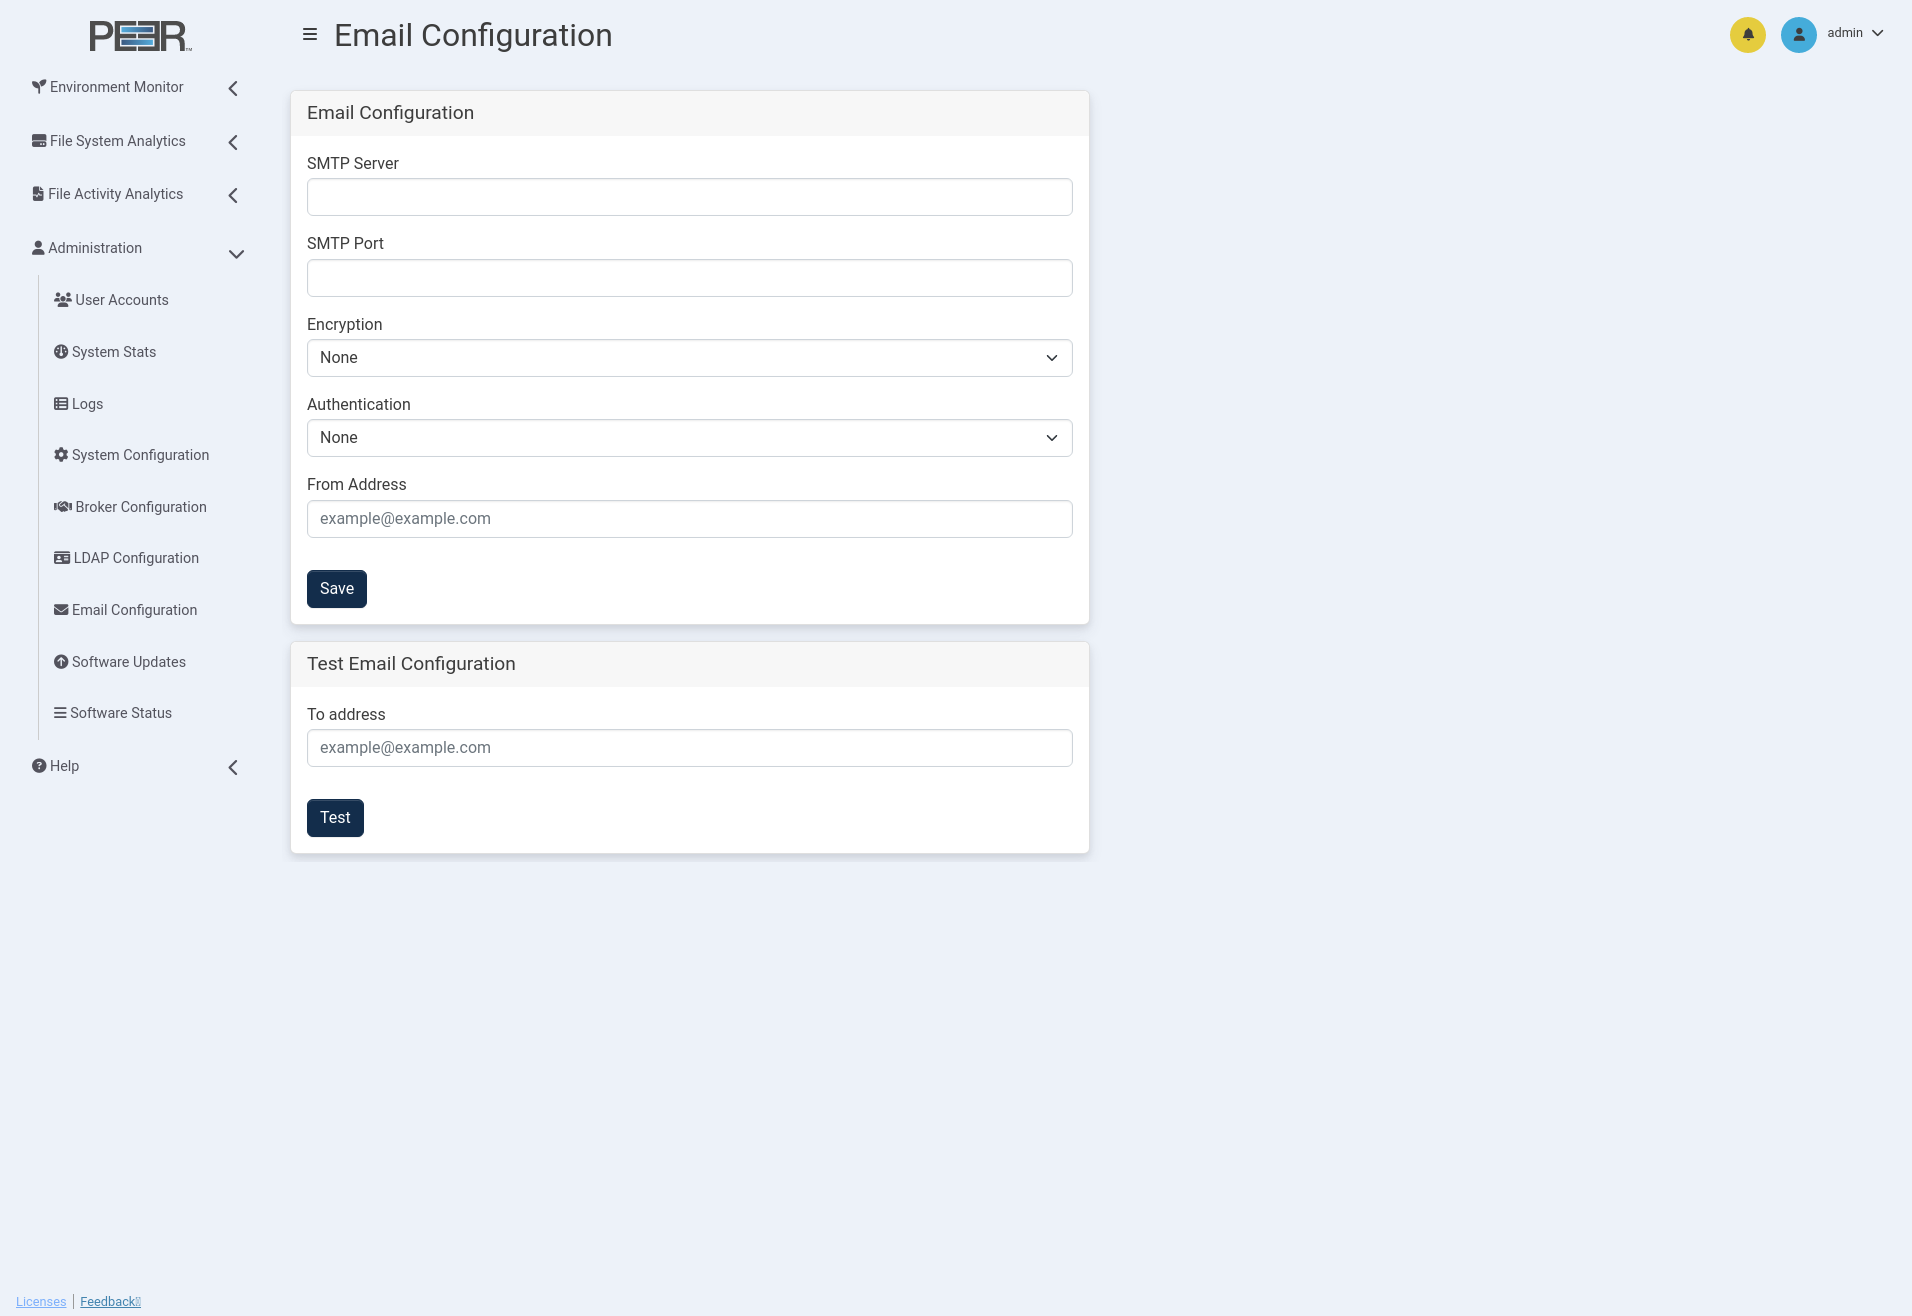
The Email Configuration page allows administrators to define the settings used by PeerIQ to send system-generated email notifications, such as alerts or user messages.
Overview
PeerIQ supports email delivery through an external SMTP server. The configuration includes the SMTP host and port, encryption type, authentication method, and sender address.
After entering the necessary information, click Save to store the settings.
The configuration can be verified using the Test Email Configuration card at the bottom of the page.
SMTP Configuration Fields
| Field | Description |
|---|---|
| SMTP Server | The hostname or IP address of the mail server used for sending email. |
| SMTP Port | The port number used by the mail server (for example, 25, 465, or 587). |
| Encryption | Select the encryption type for email transmission. Options include None, SSL, and STARTTLS. |
| From Address | The email address used as the sender for PeerIQ notifications. |
Authentication Methods
PeerIQ supports three types of authentication: None, Basic, and OAuth 2.0.
None
Select None when your SMTP server does not require authentication. Only the basic SMTP server, port, encryption, and From Address fields are needed.
Basic Authentication
Select Basic to connect using a username and password.

When this method is chosen, the following additional fields appear:
| Field | Description |
|---|---|
| SMTP Username | The username for the SMTP account. |
| SMTP Password | The password associated with the SMTP account. |
After completing all fields, click Save to apply the configuration.
OAuth 2.0 Authentication (Office 365)
Select OAuth 2.0 when using Microsoft 365 (Office 365) or Exchange Online. This method applies to all cloud-hosted mailboxes authenticated through Microsoft Entra ID. This method provides secure, token-based authentication instead of storing user credentials.
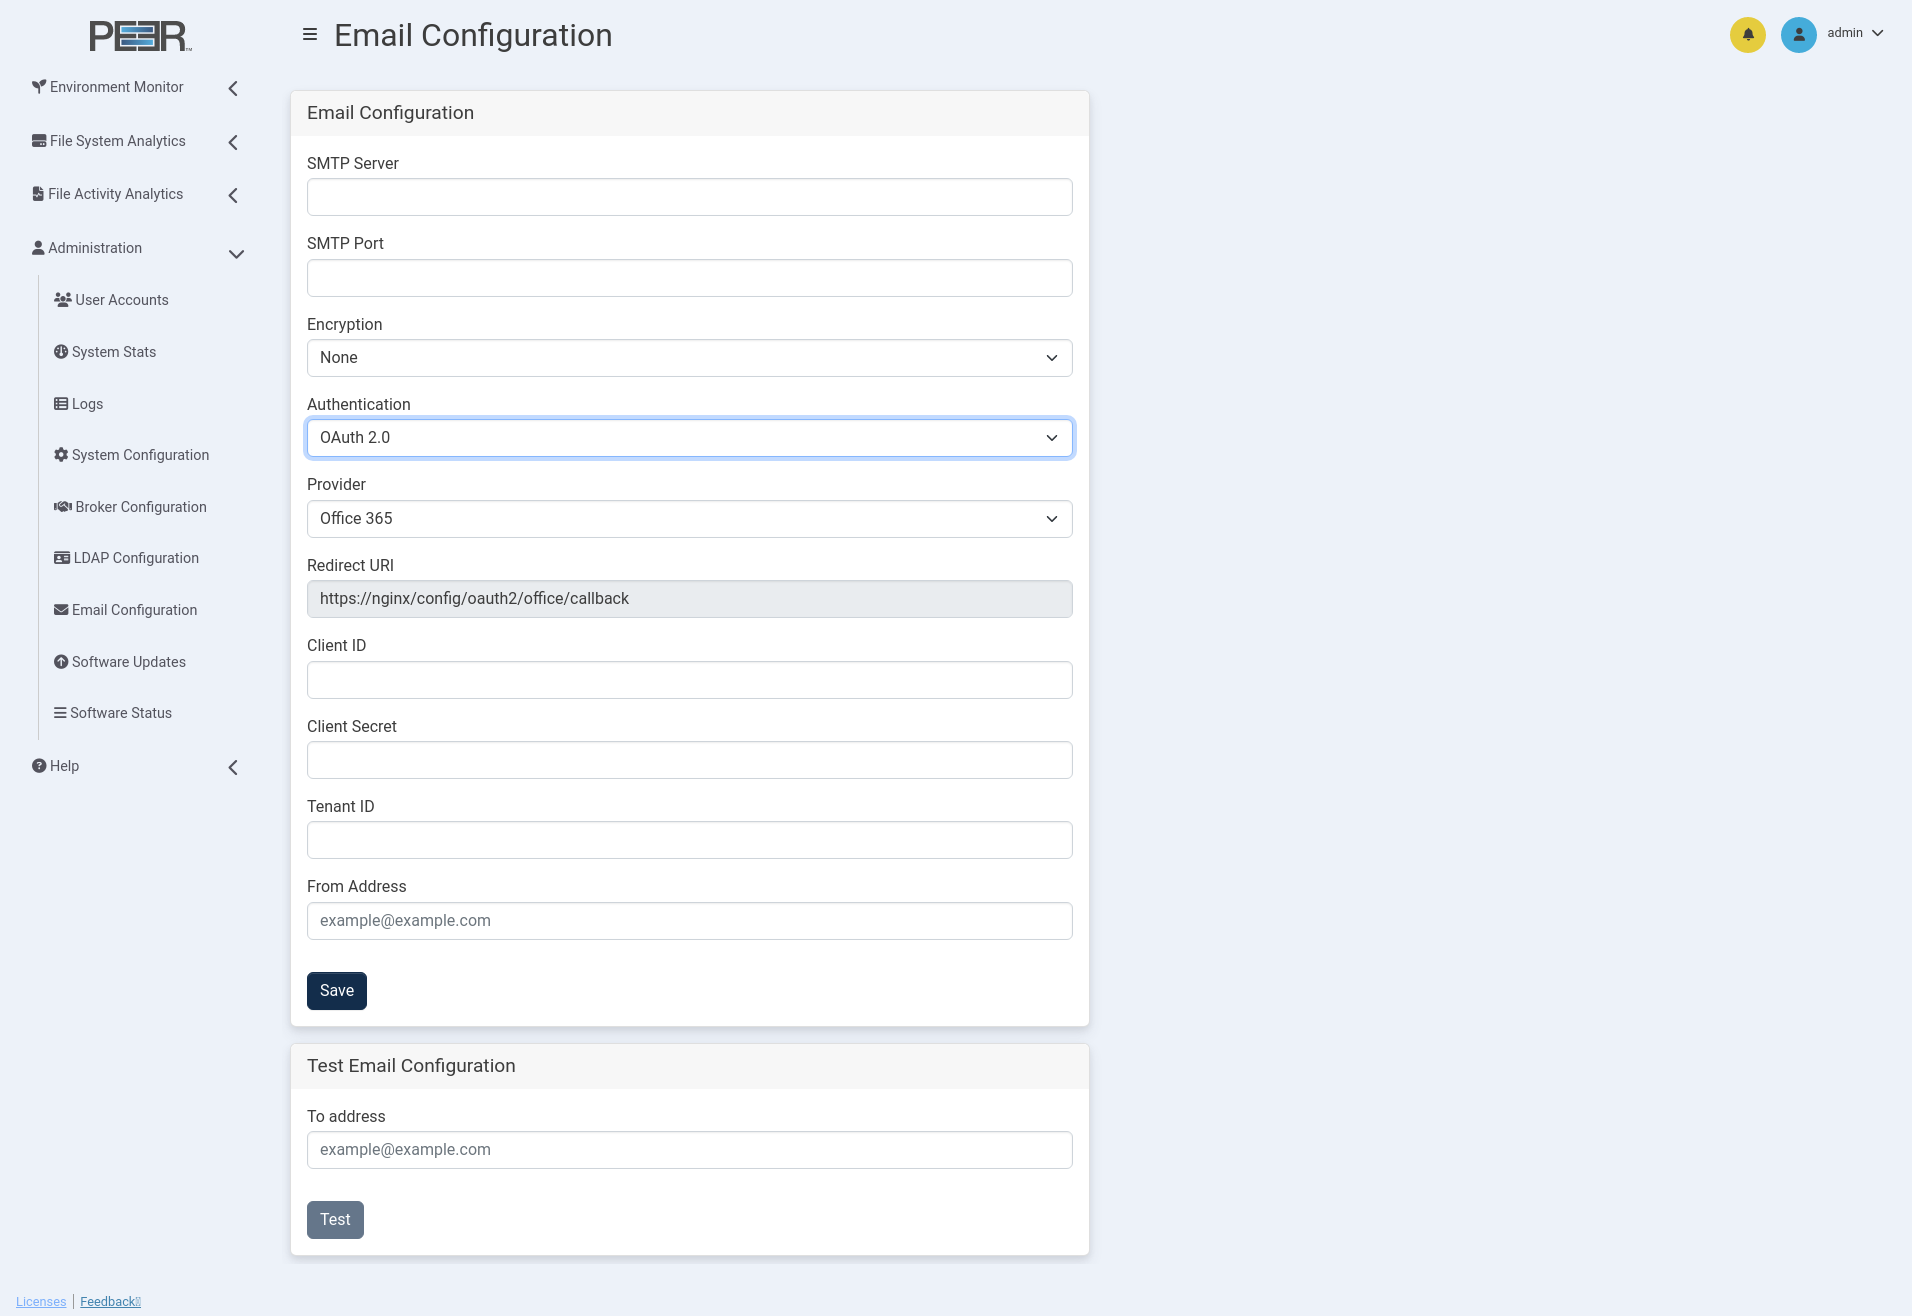
Additional fields appear when OAuth 2.0 is selected:
| Field | Description |
|---|---|
| Provider | Choose Office 365. |
| Redirect URI | This value is automatically generated and must match the redirect URI registered in Microsoft Entra ID. |
| Client ID | The application (client) ID from your Microsoft Entra ID registration. |
| Client Secret | The client secret created during app registration. |
| Tenant ID | The directory (tenant) ID for your organization in Entra ID. This can be tied to either an Azure or Microsoft 365 (Office 365) subscription. |
| From Address | The email address used as the sender for PeerIQ notifications. |
Example: Office 365 Configuration
When connecting PeerIQ to Office 365 using OAuth 2.0, the recommended settings are as follows:
| Field | Value |
|---|---|
| SMTP Server | smtp.office365.com |
| SMTP Port | 587 |
| Encryption | STARTTLS |
| Authentication | OAuth 2.0 |
| Provider | Office 365 |
These values ensure compatibility with Microsoft’s secure mail relay and token- based authentication.
Configuring Office 365 / OAuth 2.0 in Microsoft Entra ID
Before PeerIQ can send email using Office 365 with OAuth 2.0, an application must be registered in Microsoft Entra ID (formerly Azure AD).
Step 1 – Navigate to App Registrations
- Navigate to Microsoft Entra admin center → Microsoft Entra ID →
App registrations
Note: At document creation the URL is
https://entra.microsoft.com/#view/Microsoft_AAD_RegisteredApps/ApplicationsListBlade/quickStartType=/null/sourceType/Microsoft_AAD_IAM - Select New Registration.
Step 2 – Create the Application
- Enter a descriptive name such as PeerIQ Email Integration.
- Under Supported Account Types, choose Accounts in this organizational directory only.
- In Redirect URI, select Web and enter the Redirect URI displayed in
your PeerIQ configuration page (for example,
https://<your_peeriq_host>/config/oauth2/office/callback). - Click Register.
Step 3 – Gather App Details
After registration, copy the following from the application overview page:
- Application (Client) ID
- Directory (Tenant) ID
In PeerIQ, these values must be entered in the Client ID and Tenant ID fields under the Email Configuration page when OAuth 2.0 and Office 365 are selected.
Step 4 – Generate a Client Secret
- In the left menu, select Certificates & Secrets.
- Under Client Secrets, click New Client Secret.
- Provide a description and expiration duration.
- Copy the Value of the secret immediately, this must be entered in the Client Secret field within the PeerIQ Email Configuration page.
Note: Once you leave this page in Entra, the Client Secret value will no longer be visible. If lost, you will need to generate a new one.
Step 5 – Assign API Permissions
- In the left menu, select API Permissions > Add a Permission.
- Choose Microsoft Graph > Delegated Permissions.
- Add the following permissions:
-
Mail.Send-SMTP.Send-offline_access-User.Read - Click Grant admin consent for your organization.
If the Grant admin consent button appears greyed out, you may not have sufficient administrative privileges in your Microsoft Entra ID. Contact your Microsoft Entra ID administrator to complete this step.
Step 6 – Complete PeerIQ Configuration
Return to the PeerIQ Email Configuration page and enter the following:
| PeerIQ Field | Microsoft Entra ID |
|---|---|
| Client ID | Application (Client) ID |
| Tenant ID | Directory (Tenant) ID |
| Client Secret | Secret Value generated in Step 4 |
| Redirect URI | Must match the URI used during registration |
| Provider | Office 365 |
In the From Address field, enter the email address of the account used to authenticate during the Microsoft 365 sign-in process.
By default, this must match the authorized Office 365 account. If your organization has granted "Send As" or "Send on Behalf" rights, you may use another address that the authenticated account is permitted to send from.
Click Save to apply the configuration.
Authorization and Redirect
After clicking Save, a Microsoft sign-in window will appear. Use the same Office 365 account that corresponds to the From Address entered in the configuration.
Once you sign in, Microsoft will ask you to grant the application permission to send email on your behalf. Approve the request to complete the OAuth 2.0 authorization process.
Upon successful authorization, PeerIQ displays a confirmation screen:
Authorization succeeded. The page will automatically redirect back to PeerIQ, confirming that the OAuth credentials have been securely stored and validated.
Testing the Configuration
After successful authorization, it is recommended to verify that PeerIQ can send emails using the configured account.
- In the Test Email Configuration section, enter a valid destination email address in the To Address field.
- Click Test.
PeerIQ will attempt to send a test message using the configured SMTP settings.
If successful, you will receive an email with the subject line:
Receiving this message confirms that your Office 365 configuration and authorization are functioning correctly.
LDAP Configuration
You can manage LDAP access on the LDAP Configuration page.
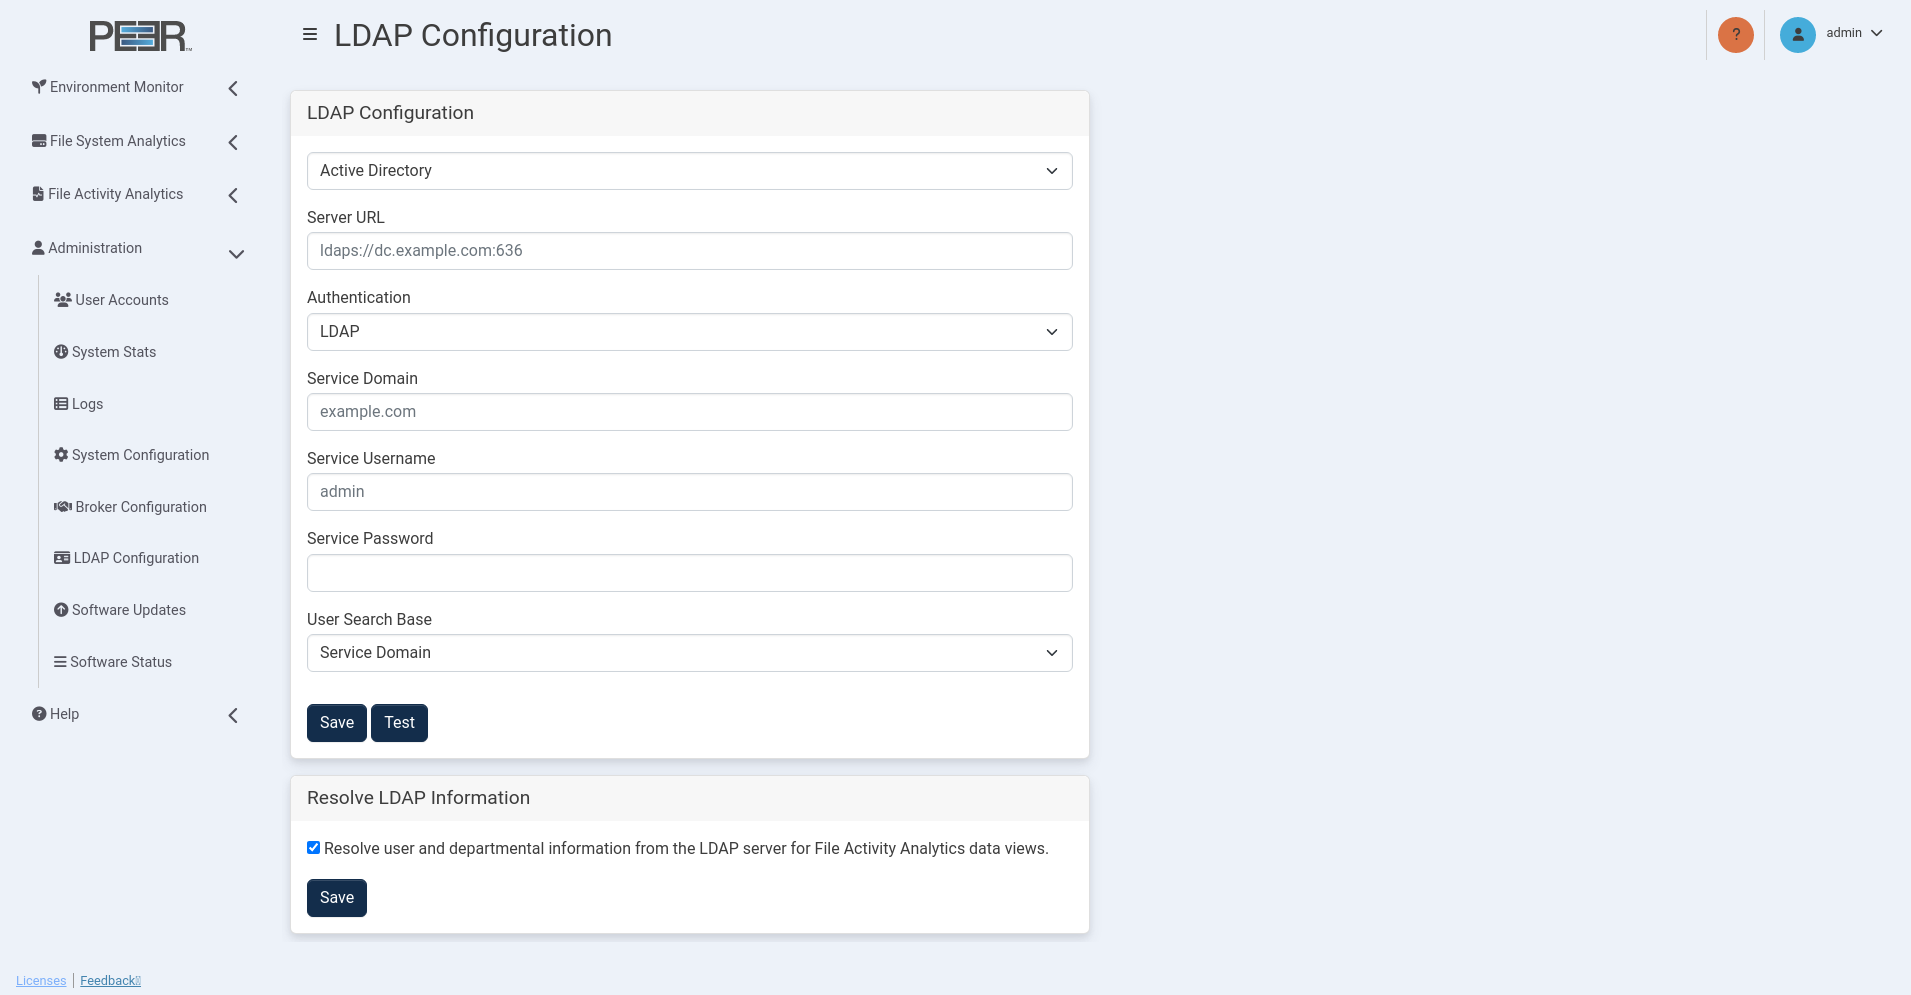
The LDAP Configuration page contains two cards:
| Card | Description |
|---|---|
| LDAP Configuration | Use this card to configure a connection to an LDAP server. |
| Resolve LDAP Information | Use this card to enable user name resolution using NFS UIDs and SIDs, as well as retrieving department information from AD servers. |
Configuring Access for LDAP Users
To enable LDAP support within PeerIQ, use the LDAP Configuration card. The process to enable LDAP access involves two steps:
Configuring LDAPS
LDAPS (Lightweight Directory Access Protocol over SSL) secures directory information exchange over an encrypted connection, ensuring data confidentiality and integrity between your server and client applications. This section provides instructions for setting up LDAPS with PeerIQ using trusted certificates.
Prerequisites:
-
Ensure you have SSH and SCP tools available for this configuration process.
-
Ensure you have a supported LDAP server. PeerIQ supports the following:
-
Microsoft Windows Active Directory (2016 and newer)
-
OpenLDAP
-
Red Hat Identity Management
-
LDAPS establishes TLS connections using the certificates present in PeerIQ's host trust store. Use one of the following methods to include certificates in the trust store.
Method 1: Using a Certificate from a Certificate Authority
If you have a certificate from a certificate authority that is valid for any FQDN in the domain *.examplecompany.org, and you're using this certificate for your internal servers (e.g., adhost.examplecompany.org), the certificate will be valid. In this case, the LDAPS connection will be successful, and no further action is required.
Method 2: Using Self-Signed Certificates
LDAPS will not connect using self-signed certificates unless the certificate has been imported into PeerIQ's trust store.
To import a self-signed certificate:
-
Export the certificate from the Windows AD server or copy from the Linux LDAP server as a Base-64 encoded X.509 (.CER) certificate.
-
Rename the exported file to have a .crt extension.
-
Use SCP to transfer the file onto your PeerIQ host. By default, the PeerIQ host username is peersoftware and the password is password. For example:
scp ./example.crt peersoftware@\<peeriq_ip\>:/tmp/example.crt -
Access your PeerIQ host using SSH:
ssh peersoftware@\<peeriq_ip\> -
Copy the .crt file to your certificate import location. Locations Below:
OS Certificate import location Red Hat or Rocky Linux /etc/pki/ca-trust/source/anchors/ Ubuntu Virtual Appliance /usr/local/share/ca-certificates/ For example for the Ubuntu Virtual Appliance:
sudo cp /tmp/example.crt /usr/local/share/ca-certificates/example.crt -
Run the certificate import command to inform the system about the new certificate:
OS Certificate import command Red Hat or Rocky Linux update-ca-trust extract Ubuntu Virtual Appliance update-ca-certificates For example for the Ubuntu Virtual Appliance:
sudo update-ca-certificates -
For the Ubuntu Virtual Appliance you can now exit the SSH console. For Red Hat/ Rocky Linux a reboot of the host running the PeerIQ software is required.
Note: LDAPS will not connect using self-signed certificates unless the certificate is imported into PeerIQ's trust store. If you encounter an error, it will be displayed as Failed to open socket within the User Interface next to the Test button.
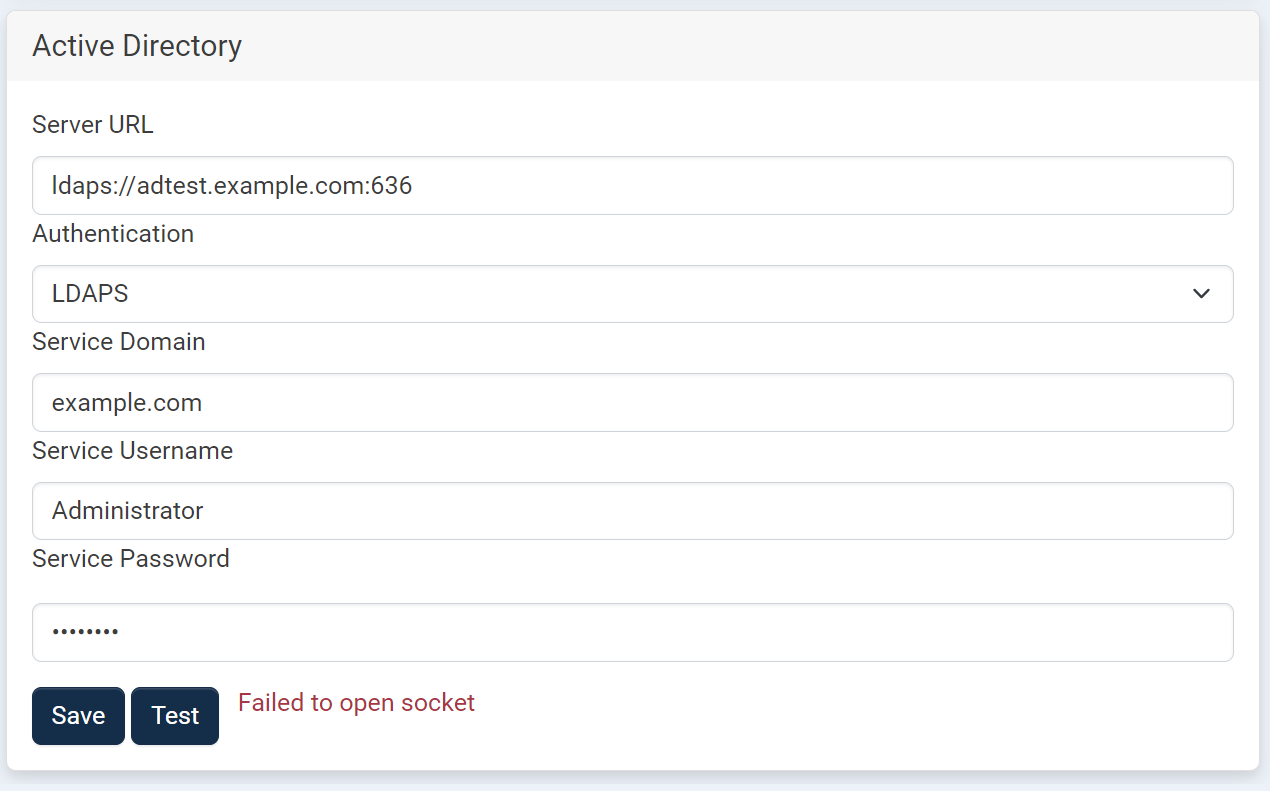
Additionally, navigating to the Logs from the left menu will show the error:
LDAP Socket Open Error: ("('socket ssl wrapping error: [SSL: CERTIFICATE_VERIFY_FAILED] certificate verify failed: unable to get local issuer certificate (_ssl.c:1131)',)",)

Configuring the Connection to the LDAP Server
Use the LDAP Configuration card to configure the connection to your Active Directory or OpenLDAP server.
To configure the connection:
-
Using your Administrator account, open the User Accounts page.
-
In the LDAP Configuration card, select either Active Directory or OpenLDAP in the first field.
-
Fill out the remaining fields based on your selection:
For Active Directory:
-
Server URL: The URL of the LDAP server (e.g., ldap://dc.london.local:389).
-
Authentication: The authentication type for the LDAP connection.
-
Service Domain: The domain for the service user account.
-
Service Username: The username for the service user account.
-
Service Password: The password for the service user account.
-
User Search Base: This setting defines the starting point in the Active Directory (AD) tree where searches for user objects will begin. Selecting Service Domain will search at the start of the domain specified in the "Service Domain" field. Selecting UPN Suffix will use the search base, derived from the portion of the username following the "@" symbol, to search the domain. For example, assume your Service Domain is set to example.com. If a user’s login name is fred@management.example.com and the User Search Base is set to use the Service Domain, the search will start at DC=example,DC=com, not DC=management,DC=example,DC=com. If the User Search Base is set to use UPN Suffix, the search will start at DC=management,DC=example,DC=com.
For Open LDAP / Red Hat Identity Management (IdM) :
-
Server URL: The URL of the LDAP server (e.g., ldap://dc.london.local:389).
-
Service Domain: The domain for the service user account.
-
Service Username: The username for the service user account.
-
Service Password: The password for the service user account.
-
User Object Class: The unique identifier for the user’s object class.
-
Username Attribute: The unique attribute for identifying a username.
-
User Search Base: The root domain where users are configured.
-
-
Click Test to perform a test connection to the LDAP server.
-
Click Save.
Resolving NFS Usernames using the Resolve LDAP Information option
The usernames displayed on File Activity Analytics pages depend on your environment's configuration. Windows-based Agents automatically resolve Security Identifiers (SIDs) to usernames for SMB client activity. However, Linux-based Agents do not automatically resolve User Identifiers (UIDs) or SIDs. PeerIQ can resolve usernames for Linux-based Agents if the UIDs and SIDs are properly mapped to usernames via LDAP or Active Directory (AD).
This section guides you through verifying your environment and configuring PeerIQ for username resolution.
Prerequisites
-
An LDAP or AD server is used for user authentication.
-
Users accessing NFS exports authenticate against the same LDAP/AD server used by PeerIQ.
-
Linux clients must use UIDs and Group Identifiers (GIDs) provided by the LDAP/AD server.
-
If using AD, ensure Unix attributes are configured.
Configuring PeerIQ for Username Resolution
Step 1: Verify LDAP Credentials in PeerIQ
-
Log in to the PeerIQ dashboard.
-
Navigate to Administration > LDAP Configuration.
-
Confirm that LDAP/AD server credentials are correct.
Step 2: Enable Username Resolution
-
Within the LDAP Configuration page, check Resolve LDAP Information.
-
Click Save.
Verifying Environment Configuration
Active Directory: Verifying Unix Attributes
AD users must have Unix attributes configured. Verify this with the following PowerShell command:
Get-ADUser -Identity "User1" -Properties uidNumber, gidNumber, loginShell,
unixHomeDirectory, msSFU30NisDomain \|

Select-Object uidNumber, gidNumber, loginShell, unixHomeDirectory,
msSFU30NisDomain
Correct output example:
uidNumber : 1001
gidNumber : 1001
loginShell : /bin/bash
unixHomeDirectory : /home/User1
msSFU30NisDomain : nisdomain
- Ensure that PeerIQ and your NFS clients belong to either the same Active Directory (AD) domain or to domains within the same AD forest that have established trust relationships.
OpenLDAP and Red Hat Identity Management Considerations
Ensure that PeerIQ and all clients authenticate against the same LDAP server. If multiple LDAP servers are used, synchronize user data to maintain consistent UIDs and GIDs across the environment.
Linux Client Configuration
Verify Linux clients use LDAP/AD-provided UIDs and GIDs by checking /etc/sssd/sssd.conf:
- Open the file:
- Ensure the [domain/default] section includes:
- Restart the SSSD service:
This configuration ensures that the system directly utilizes UIDs and SIDs provided by LDAP or Active Directory (AD).
Resolving Active Directory (AD) Departments using the Resolve LDAP Information option
The Department filter shown on the File Activity Analytics pages is dependent on your environment’s LDAP configuration.
This guide explains how to verify your environment settings and configure PeerIQ to resolve user departments using LDAP.
Prerequisites
Ensure the following before proceeding:
- An Active Directory (AD) server configured for user authentication.
- Users authenticate using the same AD server configured in PeerIQ.
- Users have their Department attribute configured in the AD server. Verify this by running the following PowerShell command on the AD server:
Configuring PeerIQ for Department Resolution
Step 1: Verify LDAP Credentials
- Log into the PeerIQ dashboard.
- Navigate to Administration > LDAP Configuration.
- Confirm that your AD server credentials are valid.
Step 2: Enable Department Resolution
- On the LDAP Configuration page, select the Resolve LDAP Information checkbox.
- Click Save to apply your changes.
Logs Page
The Logs page displays a table of log entries and enables you to send diagnostics to Peer Software Support. It is accessible only to Administrator accounts.
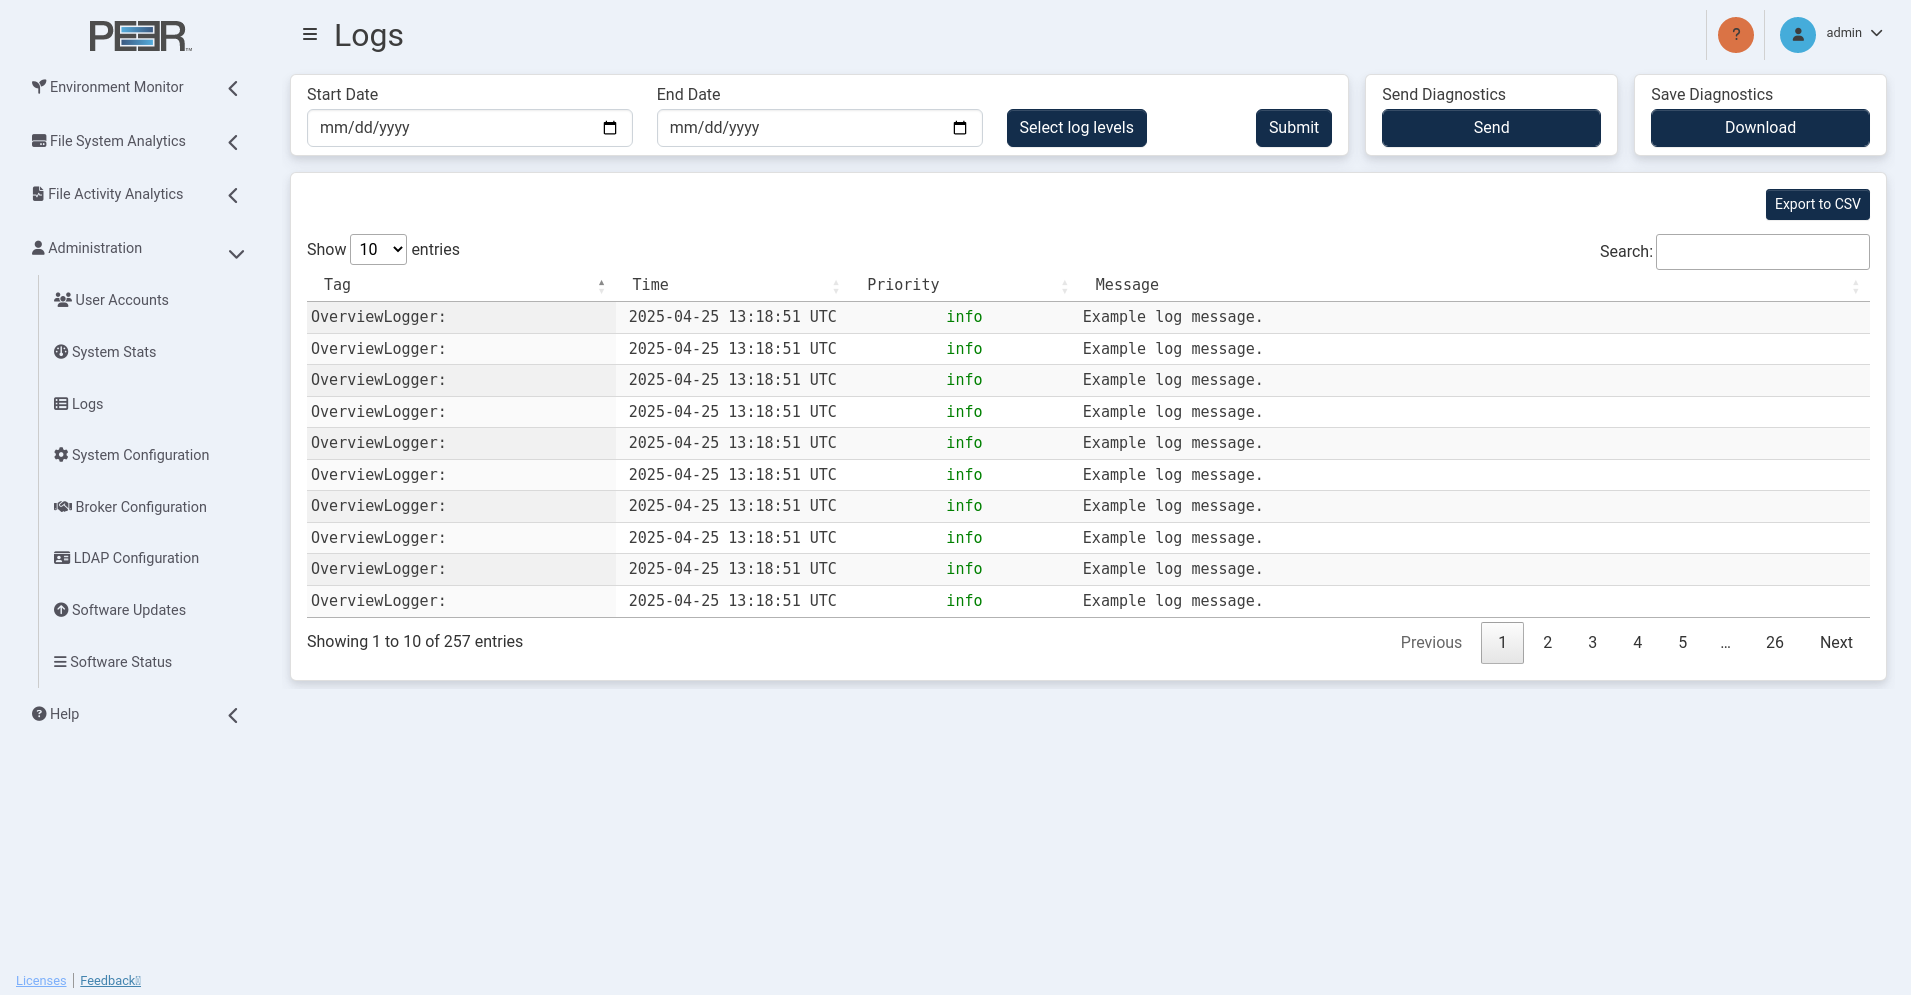
The Log table displays the most recent 5,000 log entries. You can:
-
Filter the log table using the date fields and log levels.
-
Change the number of entries displayed in the table.
-
Export the current log view to a CSV file by clicking Export to CSV.
-
Search for specific log entries within the current view.
-
Send diagnostic information to Peer Software support.
Filtering Log Contents
Use the date and log level filters to refine the data displayed in the Log table.
To filter the log data:
-
Open the Logs page.
-
Select a start date and end date.
-
Click Select logs level, and then select the types of log entries to be displayed.
-
Click Submit to enable the filters.
Sending Diagnostics
You can send a diagnostics file to Peer Software support. A connection to the internet is required for a successful upload.
To send the diagnostics file:
-
Open the Logs page.
-
In the Send Diagnostics card, click the Send button.
The Confirm Send Diagnostics dialog opens.
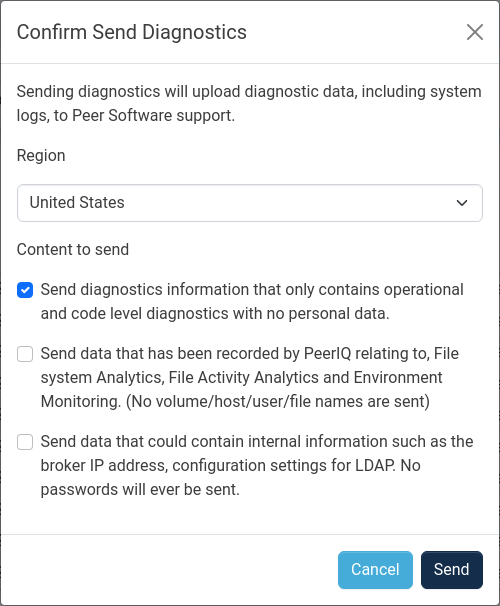
-
Select the region closest to the PeerIQ appliance for faster uploads.
-
In the Content to send section, select the levels of diagnostic data to send Peer Software Support:
-
Operation and code level diagnostics (if using the Ubuntu-based PeerIQ virtual appliance, this will also include system logs)
-
File System Analytics and Environment Monitoring
-
Configuration settings information
Note: No passwords will be included in the diagnostic logs sent to Peer Software Support.
Upon completion, a success message is displayed, and the diagnostics file is stored in the selected region.
-
Saving Diagnostics
You can save a diagnostics file for your own records or to send it to Peer Software Support if PeerIQ is unable to establish an internet connection.
To save the diagnostics file:
-
Open the Logs page.
-
In the Save Diagnostics card, click Save.
The Confirm Save Diagnostics dialog opens.
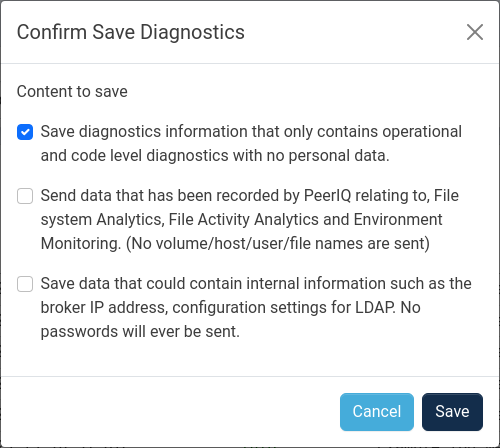
-
In the Content to save section, select the levels of diagnostic data to save:
-
Operation and code level diagnostics (if using the Ubuntu-based PeerIQ virtual appliance, this will also include system logs)
-
File System Analytics and Environment Monitoring
-
Configuration settings information
-
-
Click Save.
Note: No passwords will be included in the downloaded diagnostic logs.
Upon completion, a success message is displayed. The file will be in a compressed tar.gz format; uncompress it to access the logs in CSV format. Depending on the level of content saved, other diagnostic files in JSON format will be in folders named after their corresponding PeerIQ component.
Software Status Page
The Software Status page provides information about PeerIQ containers, and controls for starting, stopping and restarting PeerIQ containers.
The page must be accessed from the Service Administration for the container controls to be activated.
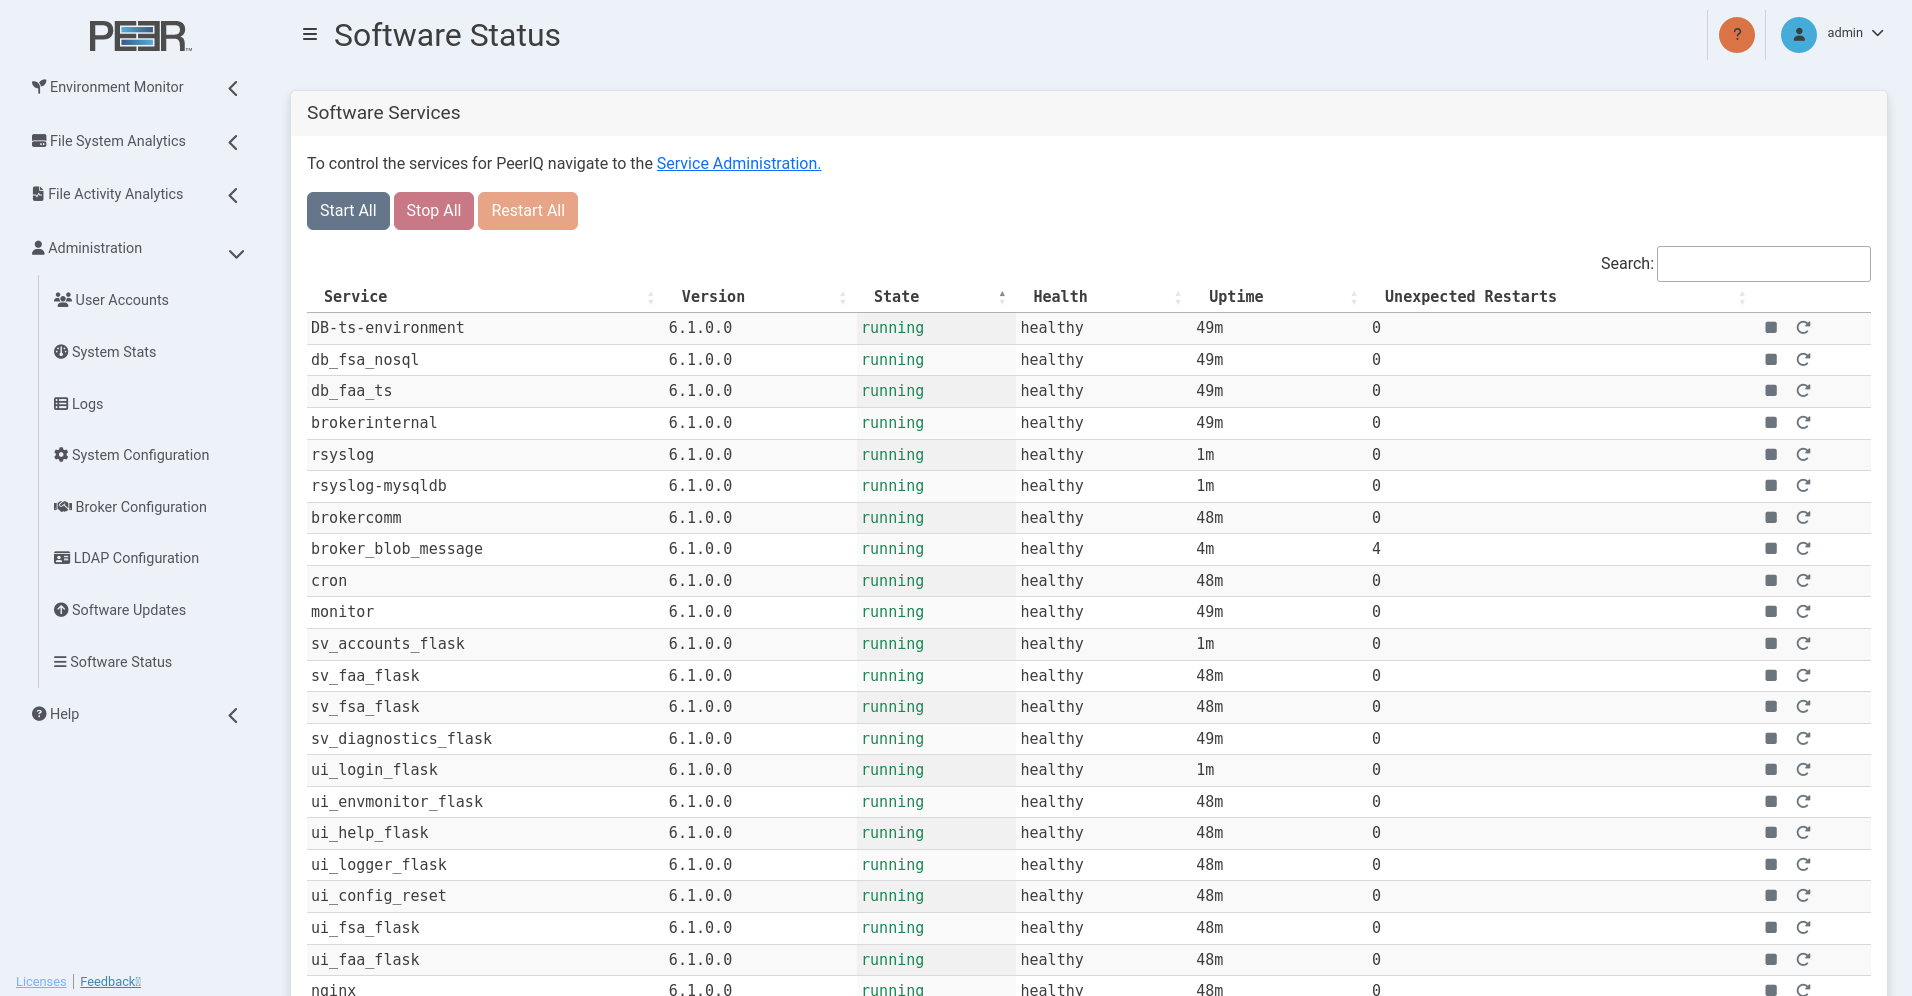
| Card | Description |
|---|---|
| Software Services | Provides controls for stopping, starting, and restarting all services. Each service represents a container. The table displays a list of all running services, along with their individual version, state, health, uptime, and the total number of unexpected restarts. Controls are provided to start, stop, and restart individual services. |
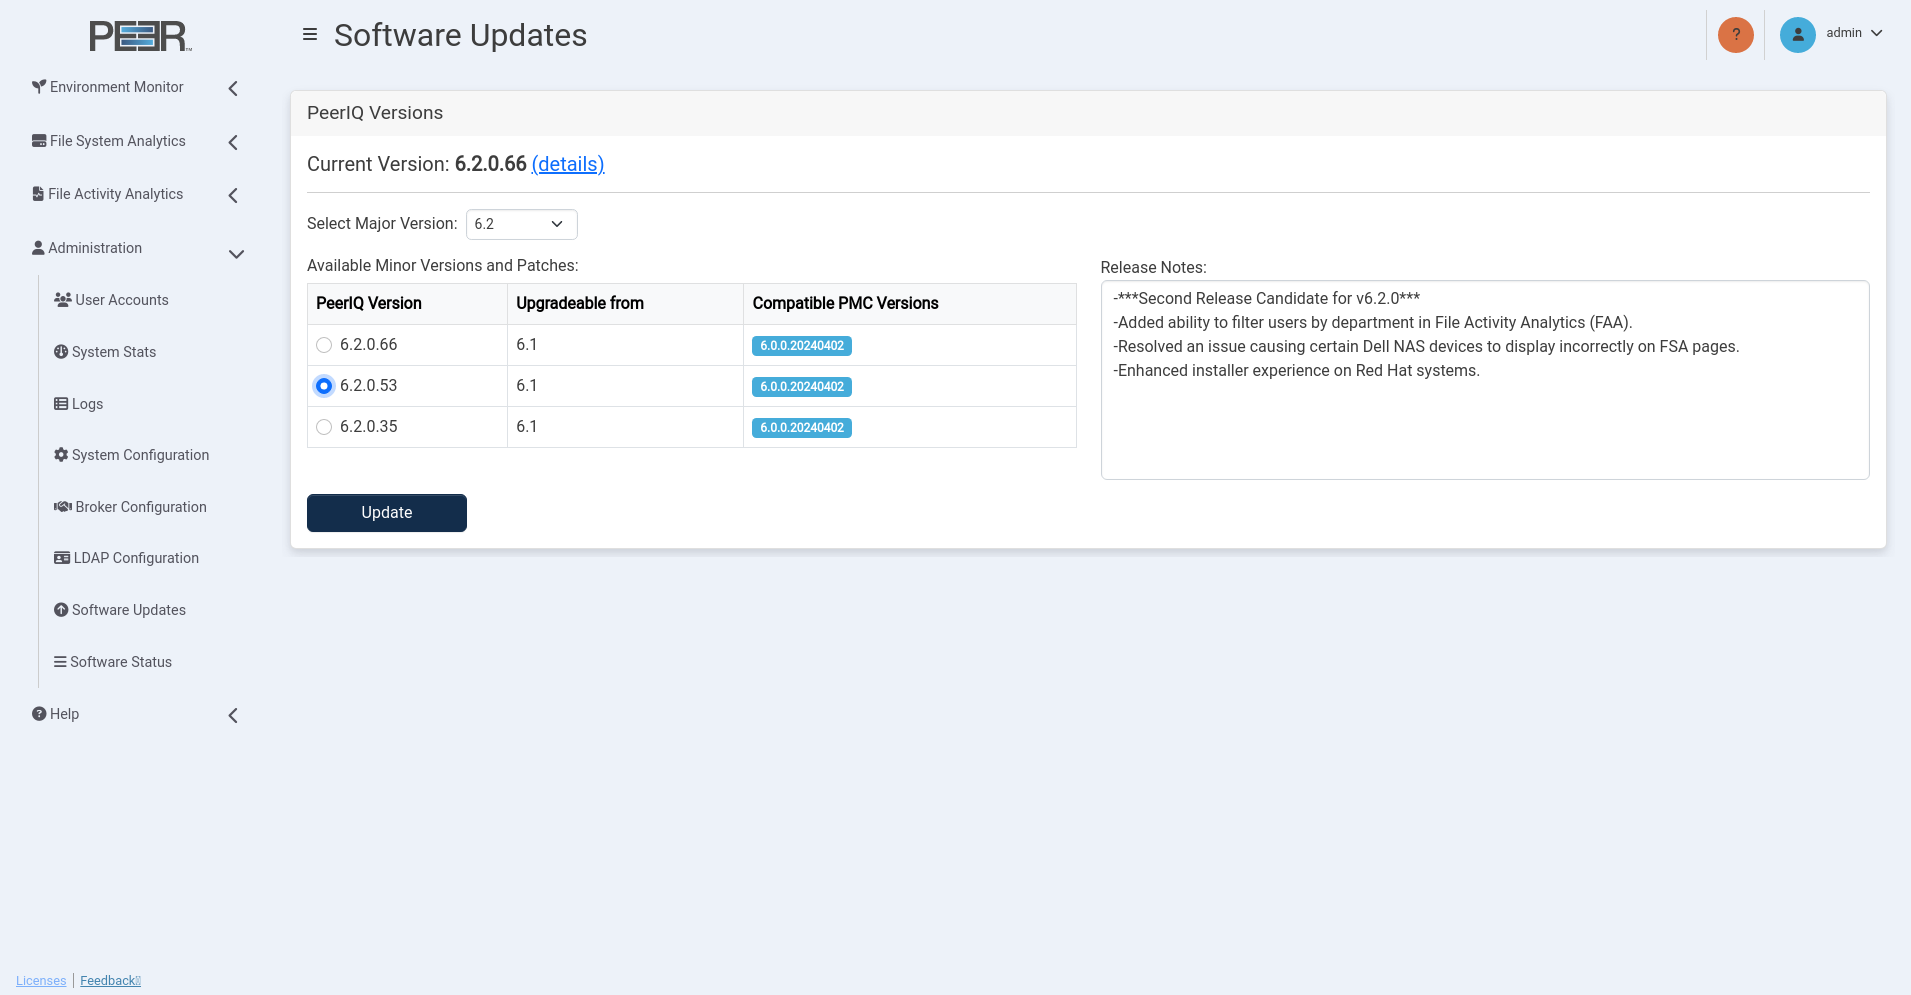
Software Updates Page
The Software Updates page provides options and information for upgrading to new PeerIQ versions, including release notes and compatibility details.
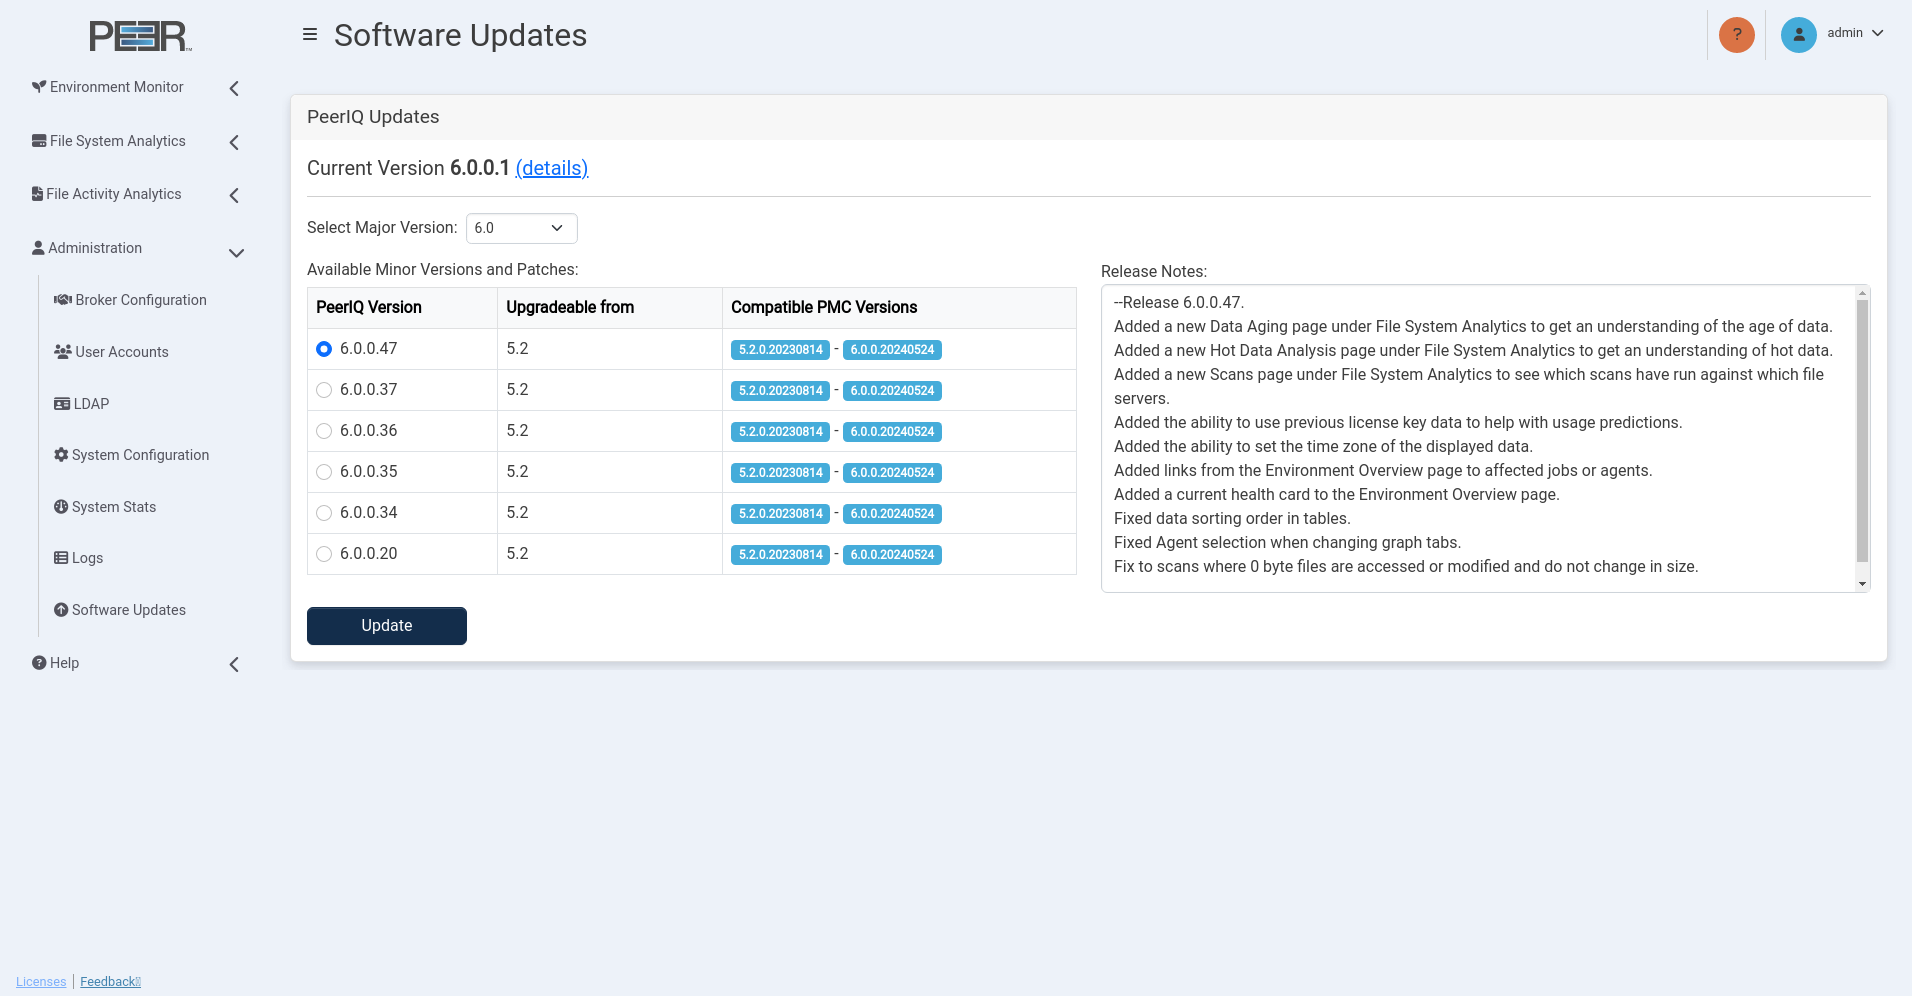
Software Updates Page Cards
The Software Updates page contains one card:
| Card | Description |
|---|---|
| Software Updates | Displays information about available PeerIQ upgrades. • Current Version: Shows the PeerIQ version currently in use. Click the details hyperlink to access the Peer Software website for additional information about your current version. • Select Major Version: Use the dropdown box to choose the major PeerIQ version you want to upgrade to. • Release Notes: Lists release notes for the selected minor version or patch. • Available Minor Versions and Patches: Displays the following information: – PeerIQ Version: You can select the desired PeerIQ version for the update by clicking the radio button next to the version name. – Upgradable From: Indicates the lowest PeerIQ version that can be upgraded to this version. – Compatible PMC Versions: Lists PMC versions compatible with this PeerIQ version. |
Updating PeerIQ
To update PeerIQ, follow these steps:
-
Choose the PeerIQ version to update to.
-
Click the Update Button to start the update process.
A dialog prompting you to confirm the update will appear.
-
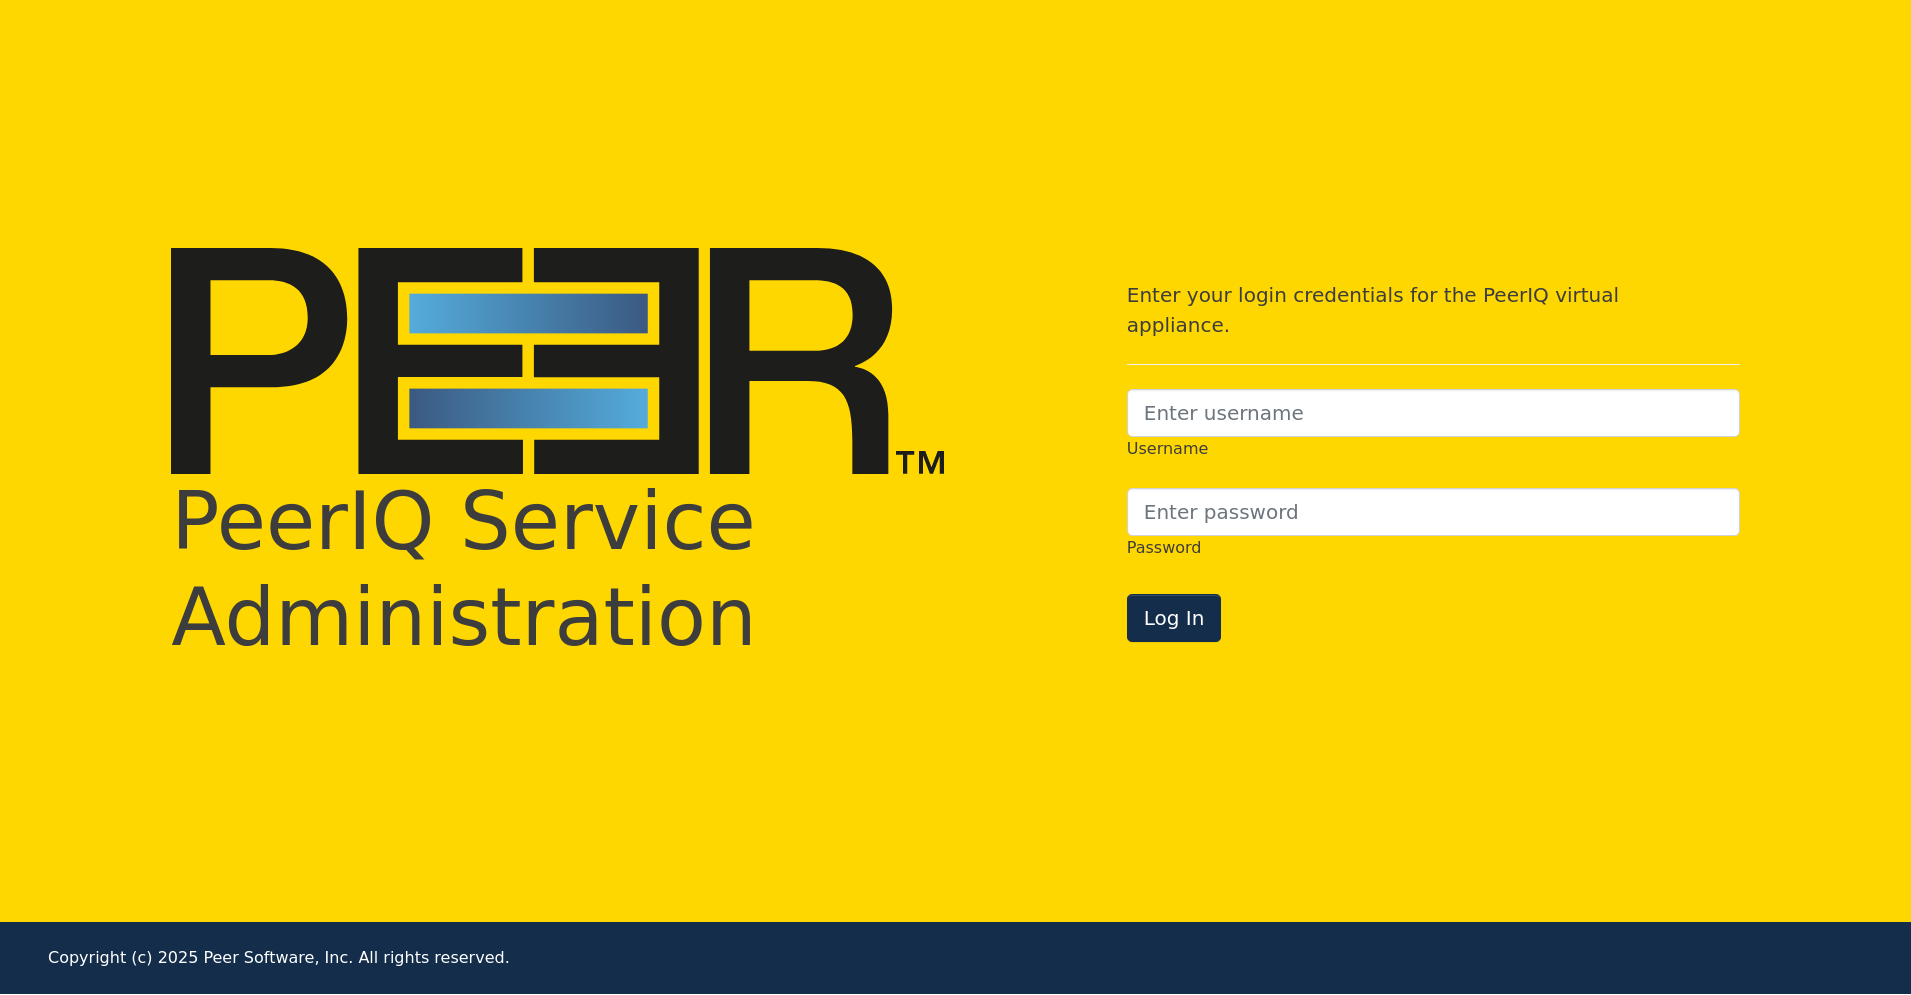
Click Proceed to open a new login screen for the software.
The PeerIQ Service Administration login page has a yellow background and a different title from the standard PeerIQ web console. It can be accessed directly via https://\<peeriqIP>:4443.
-
Log in to the PeerIQ Service Administration portal. The download for the selected PeerIQ version will begin automatically.
Note: The credentials required for accessing PeerIQ Service Administration differ from those used for the PeerIQ web console. For Virtual Appliances, use the same credentials that are used to log in via the virtual appliance console or through SSH. The default credentials are: Username: peersoftware, Password: password. These defaults are typically updated during the initial deployment of the virtual appliance. For Red Hat installs, you may use the same credentials that were used during the installation of PeerIQ, or any user account that has sudo privileges.
-
Confirm the update by clicking Yes once the download completes.
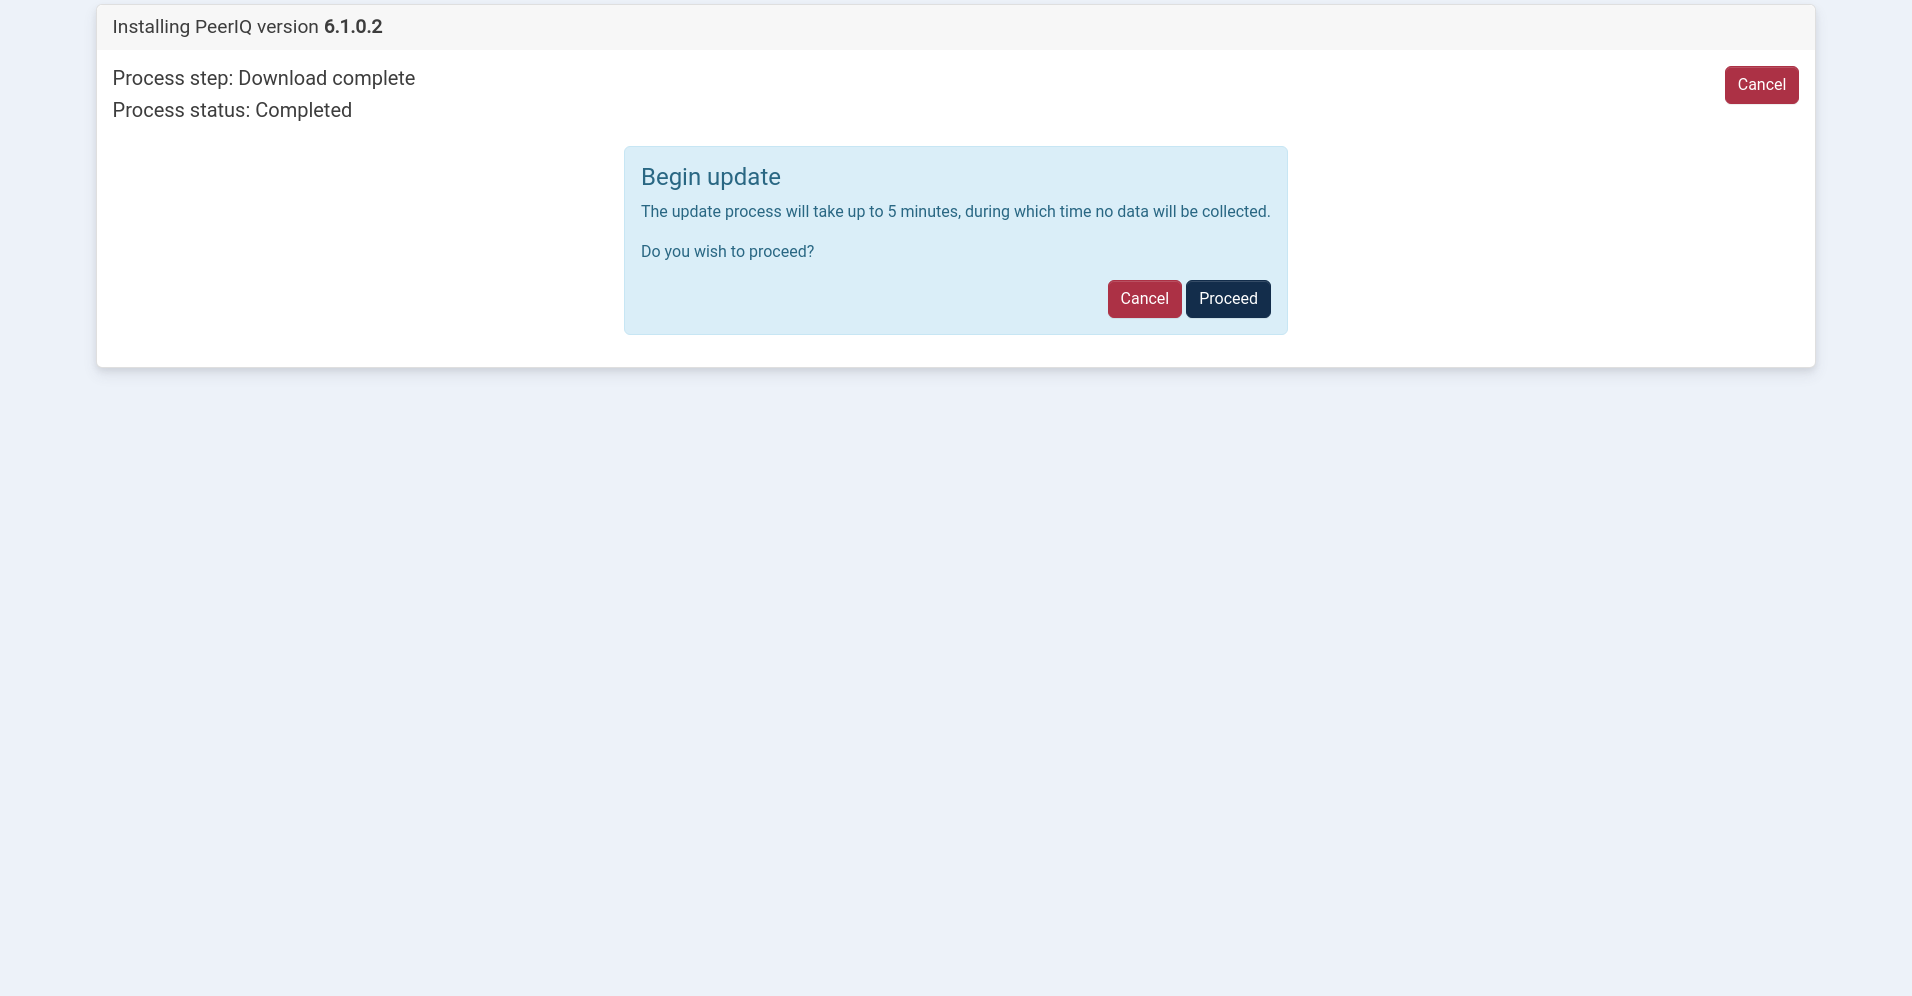
PeerIQ will be updated to the selected version.
-
After updating PeerIQ, a notice to update the service container will appear. If no action is taken within five seconds, the service container update is automatically performed. Clicking Cancel during that five second window will skip the service container update.
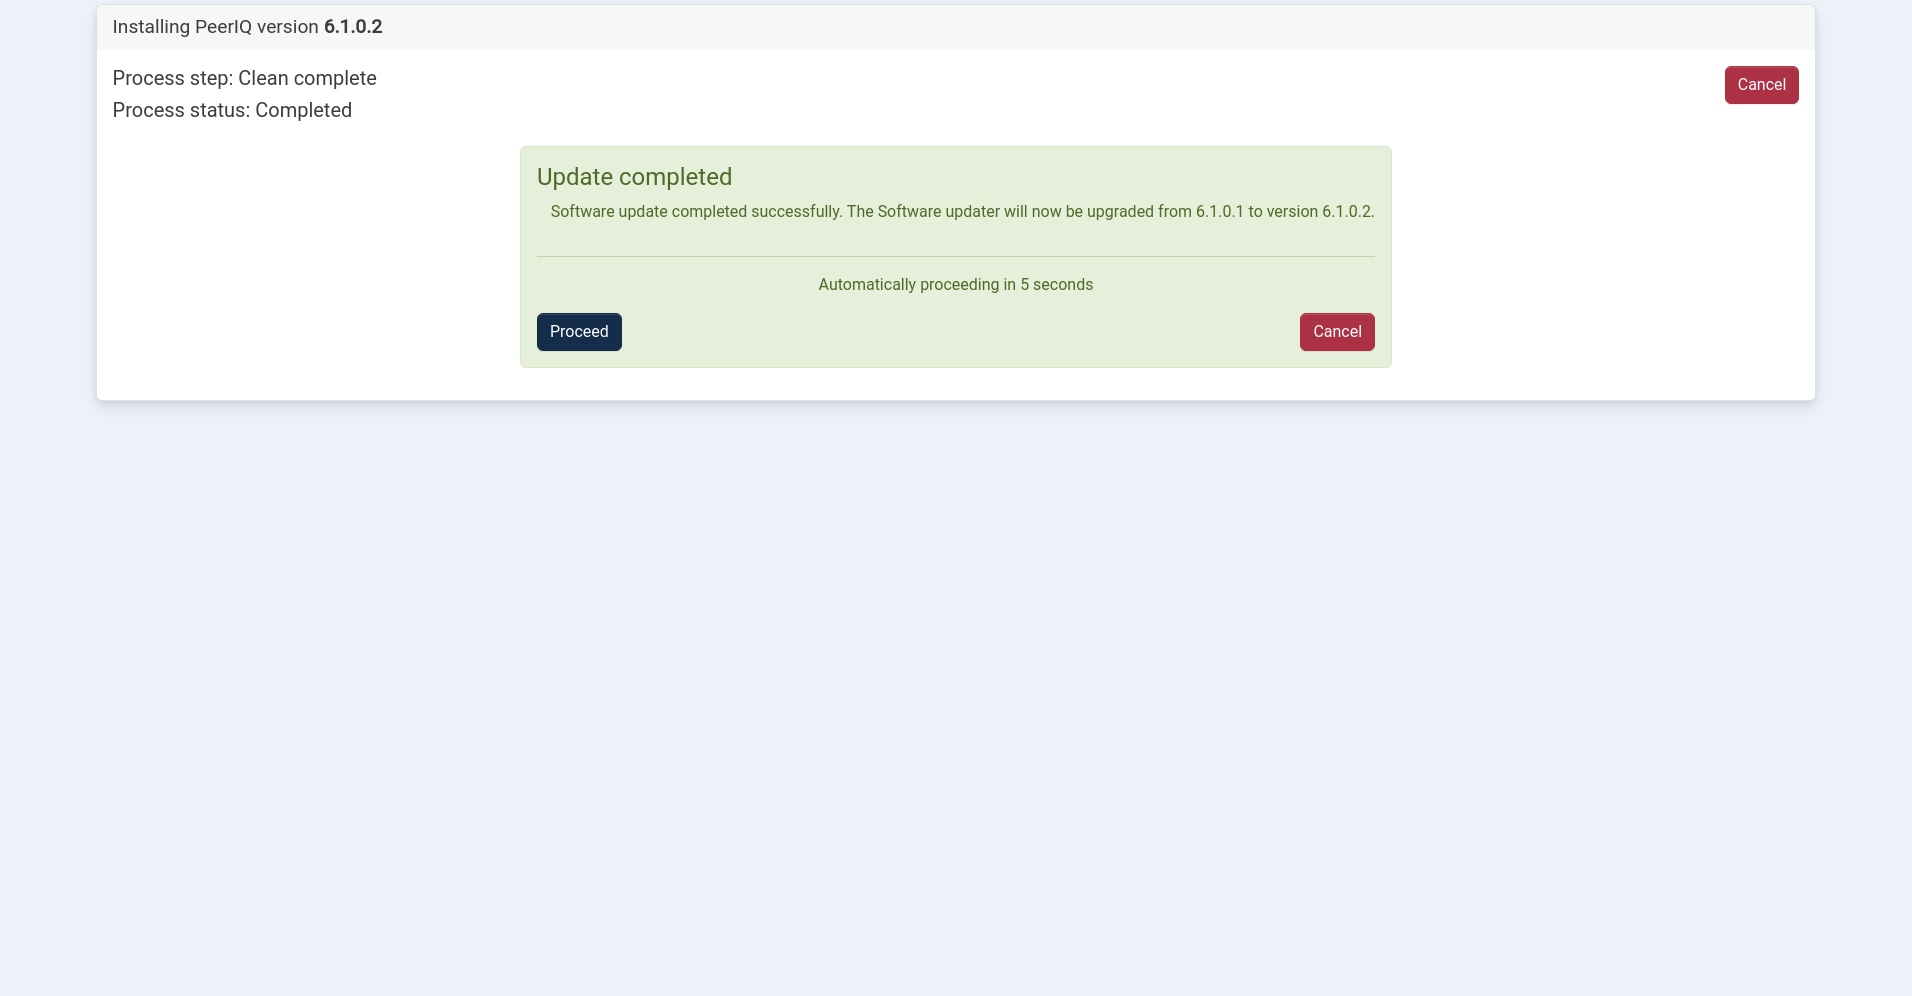
After installation, the PeerIQ login page is redisplayed.
System Configuration Page
The System Configuration page allows an Administrator to perform a complete reset, which includes erasing configuration parameters such as usernames and passwords, as well as clearing any data that has been collected from the PMC. Once the data has been erased, it cannot be recovered.
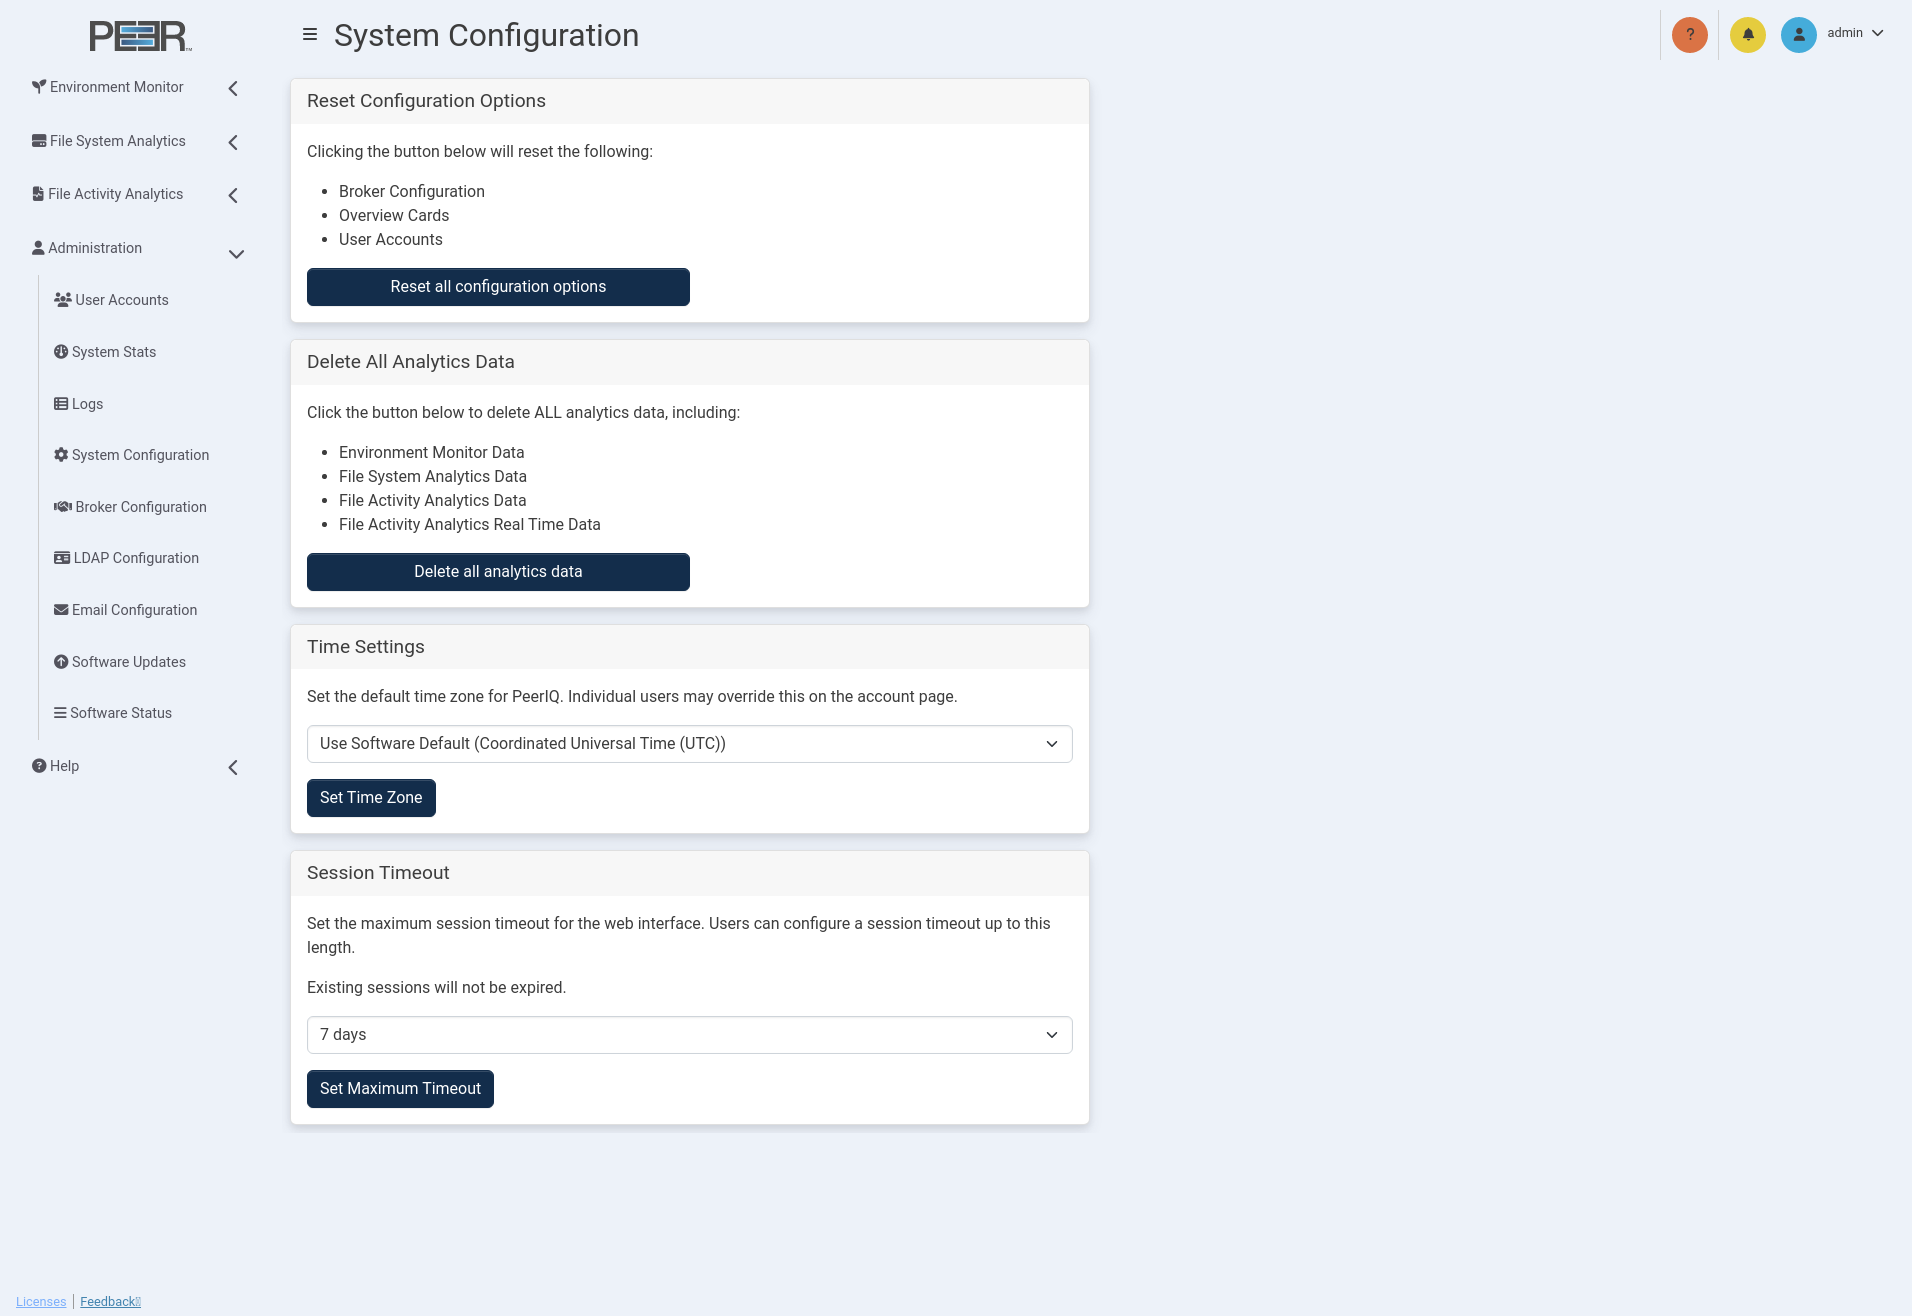
The System Configuration page has four cards:
Resetting Configuration Options
This Reset Configuration Options card enables you to revert all parameters to the default settings, as initially configured when the product was first deployed. This includes:
-
Broker configuration: The existing broker connection will be stopped.
-
Overview cards: All customizations made to Warning and Danger thresholds will be restored to the default values.
-
User accounts: All LDAP configurations will be deleted, including all user accounts and their associated settings (such as time zone). This will restore the default credentials:
-
Username: admin
-
Password: password
-
After resetting the configuration options, you will be logged out of the PeerIQ system.
Delete All Analytics Data
Clicking Delete All Analytics Data permanently removes all data collected by the PeerIQ system.
Note: This action is irreversible. Once deleted, the data cannot be recovered.
Managing Time Zone Settings
The Time Settings card enables you to set the default time zone that is used by all users on all pages within the PeerIQ user interface. You can set the time zone using the drop-down menu options to display page elements in either Coordinated Universal Time (UTC) or the time zone of each web browser accessing the pages. While this global setting is the default for all users of the system, each user can set their own time settings after logging in to PeerIQ.
Note: Downloaded logs and reports will always be in UTC format.
Session Timeout
The Session Timeout setting defines how long a user session remains active in the PeerIQ web interface before automatic expiration. Administrators can select the maximum allowed duration from the drop-down menu.
Setting a timeout ensures inactive sessions do not remain open indefinitely, improving overall security for the web interface.
Configuration
From the drop-down list, choose one of the available timeout options:
- 7 days
- 1 day
- 6 hours
- 1 hour
- 30 minutes
- 10 minutes
Once a value is selected, click Set Maximum Timeout to apply the change.
Note: Updating the timeout affects only new sessions. Existing sessions will remain active until they naturally expire or the user signs out.
System Stats Page
The System Stats page provides an overview of the virtual appliance where PeerIQ is deployed. It enables you to analyze overall performance and monitor the appliance’s health. Use this page to identify potential performance issues affecting PeerIQ and gain insights into how the appliance is operating. This page is accessible to Administrators only.
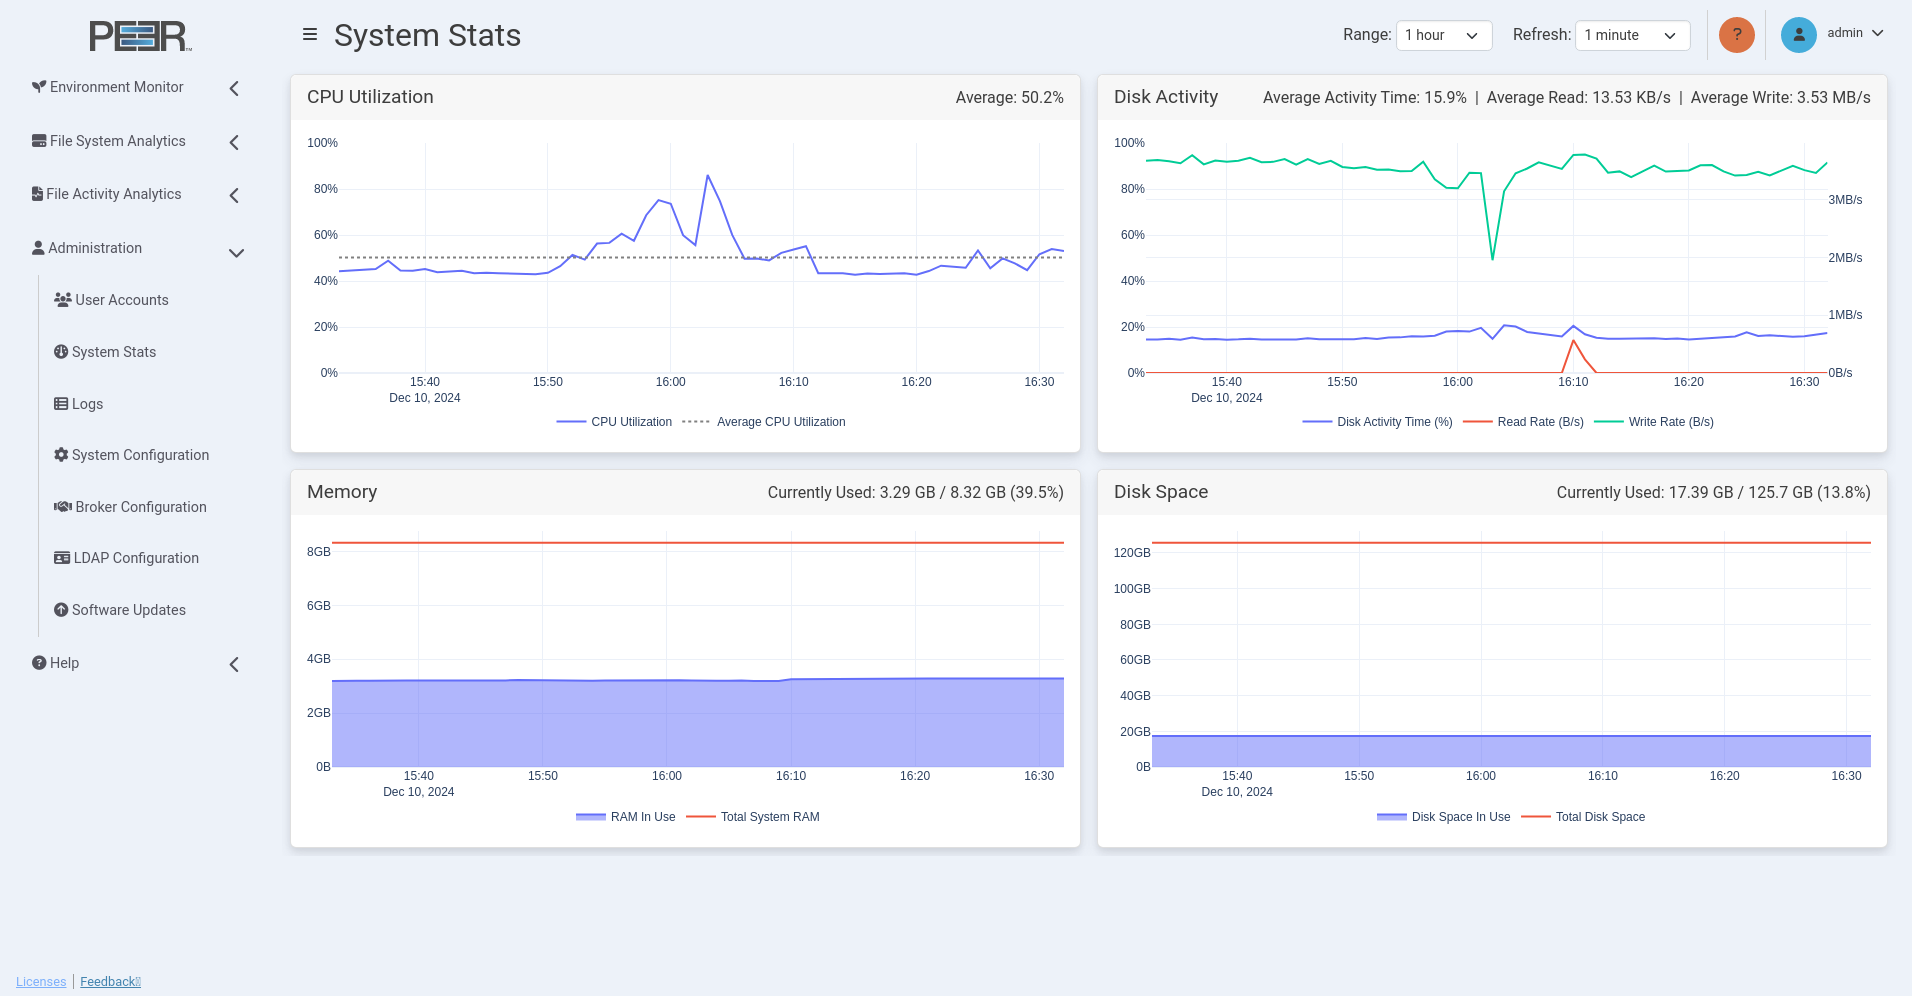
Using the System Stats Page Controls
This page features line graphs that depict activity trends over time. Use the controls located in the upper right corner of the page to adjust the date range and refresh rate of the displayed information:
-
Range: Use this to select the desired time range for the line graphs; options range from 1 hour to 4 weeks.
-
Refresh: Use this to select the interval at which the line graphs automatically refresh; Options are off (graphs will not refresh) or 1 minute.
System Stats Page Cards
The System Stats page contains four cards:
| Card | Description |
|---|---|
| CPU Utilization | Displays a line graph illustrating CPU usage over time, reflecting the selected time range. The graph shows the percentage of CPU used and the average CPU utilization for that period. The average utilization percentage is displayed in the top right of the card. Hover over a data point to view its date and time, as well as the interval it represents, which depends on the range setting. For example, if the range setting is 1 week or longer, the hover box will display "(60 minute average)" below the date and time. |
| Disk Activity | Displays a line graph showing total disk activity as a percentage over time, reflecting the selected time range. It also shows Bytes per second (B/s) for both disk read and write speeds. The average disk activity time, as a percentage, and the average read and write speeds for the selected time range are shown in the top right of the card. Hover over a data point to view its date and time, as well as the interval it represents, which depends on the range setting. For example, if the range setting is 1 week or longer, the hover box will display "(60 minute average)" below the date and time. |
| Memory | Displays a line graph representing memory usage over time, with the total amount of memory assigned to the virtual appliance. The graph reflects the selected time range, with current memory usage displayed as both a fraction and a percentage in the top right of the card. The graph displays point measurements rather than averages, regardless of the range option selected. The Currently Used values in the headers reflect the most recent data point in the database, rather than just the most recent point in the plot. For example, if the range is set to 1 week, the last point in the Memory plot will be from the most recent hour (on the hour), but the header will display the memory in use as of the most recent minute. |
| Disk Space | Displays a line graph depicting disk space usage over time, reflecting the selected time range. It includes the total amount of disk space assigned to the virtual appliance. Current disk space usage is shown as both a fraction and a percentage in the top right of the card. The graph displays point measurements rather than averages, regardless of the range option selected. The Currently Used values in the headers reflect the most recent data point in the database, rather than just the most recent point in the plot. For example, if the range is set to 1 week, the last point in the Memory plot will be from the most recent hour (on the hour), but the header will display the memory in use as of the most recent minute. |
User Accounts Page
You can manage user accounts on the User Accounts page.
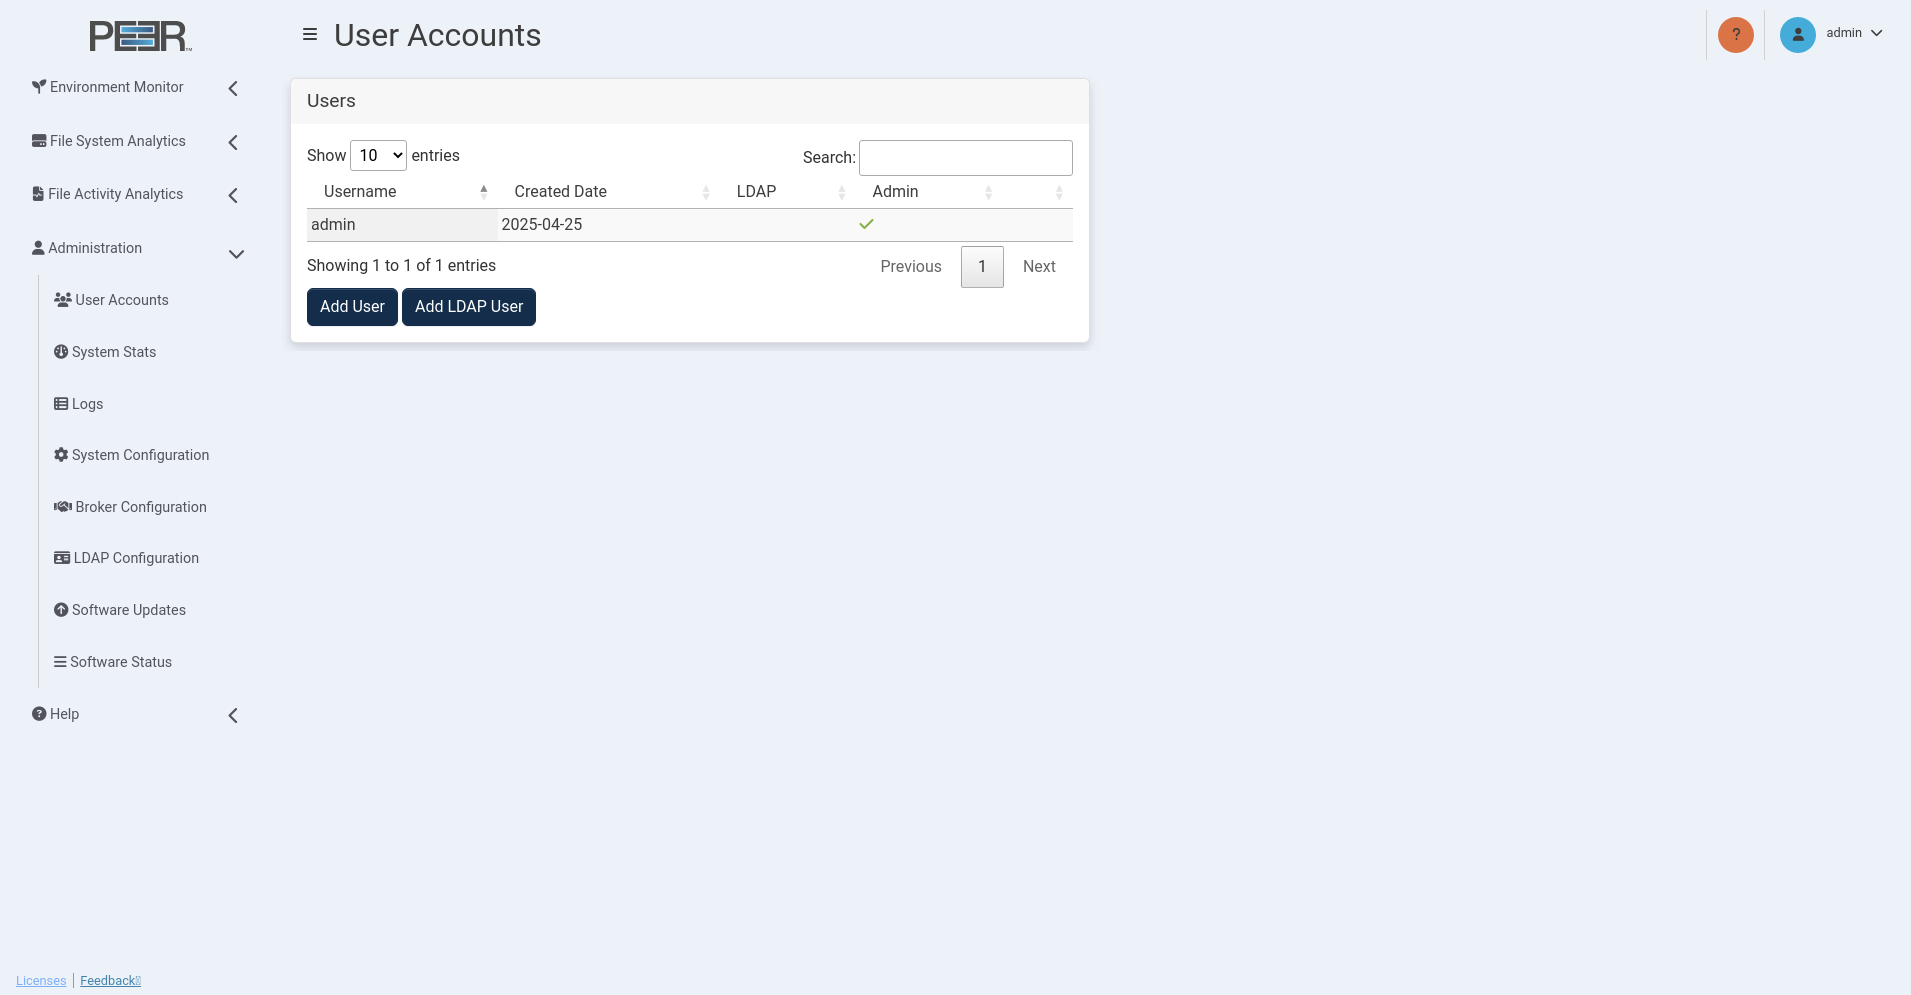
The User Accounts page contains one card:
| Card | Description |
|---|---|
| Users | Use this card to view and delete all local users and add LDAP users. |
Adding and Removing Users
Use the Users card on the User Accounts page to add, view, and remove users.
Adding a Local User
Adding a local user will allow that user to log in to PeerIQ using the specified username and password.
To add a local user:
-
Using your Administrator account, open the User Accounts page.
-
Click the Add User button in the Users card.
-
Fill out the fields in the Add User dialog:
-
Username: Enter the username for the new user.
-
Password: Enter the password for the new user. The user can change this later.
-
Role: Assign a role to the user within PeerIQ. Roles define what users can do in terms of configuring PeerIQ as well as viewing data and reports. Administrators have full access to PeerIQ, while non-Administrators have limited access to data and reports, and cannot make configuration changes.
-
-
Click Add User.
Adding an LDAP User
Before you can add an LDAP user, you must configure the connection to the LDAP Server. For details, see the section Configuring Access for LDAP Users.
Adding an LDAP user will allow that user to login to PeerIQ using their LDAP login credentials.
To add an LDAP user:
-
Using your Administrator account, open the User Accounts page.
-
Click the Add LDAP User button in the Users card.
-
Fill out the fields in the Add LDAP User dialog:
-
Domain: Enter the domain to which the user belongs.
-
Username: Enter the user's username within the specified domain. Do not include the domain in this field.
-
Role: Assign a role to the user within PeerIQ. Roles define what users can do in terms of configuring PeerIQ as well as viewing data and reports. Administrators have full access to PeerIQ, while non-Administrators have limited access to data and reports, and cannot make configuration changes.
-
-
Click Add User.
The newly added user will log in using their username, followed by the @ symbol, followed by their domain (e.g., johnsmith@london.local).
Removing a User
To remove a user from the system, follow this step:
-
Using your Administrator account, open the User Accounts page.
-
Click the red trash icon at the end of row of the user you want to delete.
Note: The default user cannot be deleted.