|
<< Click to Display Table of Contents >> Interface |
  
|
|
<< Click to Display Table of Contents >> Interface |
|
Peer Management Center now offers a new way to manage and monitor collaboration jobs via a robust web interface. Unlike many other web management consoles, Peer Management Center's web interface is very responsive and is built to mirror the functionality of the rich client (which is still included with the Peer Management Center installer for use by system administrators). When properly configured, the web interface allows system administrators to manage Peer Management Center's collaboration jobs from any location without the need to remotely log in to the Peer Management Center server.
In addition, this web interface includes a role-based login system with two out-of-the-box roles: admin and helpdesk. The former has complete access to all functionality found in the Peer Management Center's rich client, while the latter only has a read-only view of collaboration jobs along with the ability to release conflicts for any running jobs.
The setup process for the web interface is driven by following screen within the installer for the Peer Management Center:
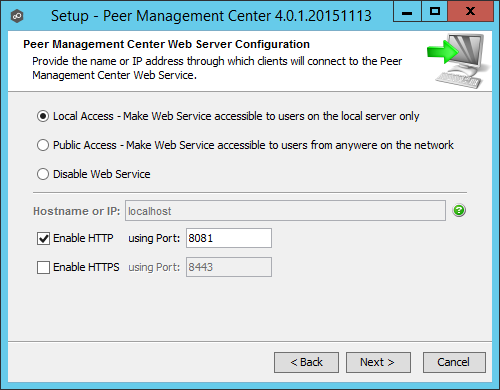
The options on this screen are as follows:
Local Access |
Selecting this option will allow access to the web interface only when remotely connected into and using a web browser on the local Peer Management Center server. |
Public Access |
Selecting this option will allow access to the web interface via the configured hostname or IP address. Please note that Public Access does not necessarily mean that anyone on the Internet will be able to access the web interface. This access should be further limited via NAT and network firewall policies.
As an option, "0.0.0.0" can be used in the Hostname or IP field in conjunction with the Public Access option to fully open up web access on your network. |
Disable Web Service |
Selecting this option will completely disable the web interface and set the Peer Management Center Web Service to manual. |
Hostname or IP |
This is the hostname or IP address via which clients can access the web interface. If Local Access is set, this will be forced to use "localhost". |
Enable HTTP (using Port) |
Enables HTTP access to the web interface using the specified port. |
Enable HTTPS (using Port) |
Enables HTTPS access to the web interface using the specified port and a built-in SSL certificate. More details on changing SSL certificates can be found here. |
If you need to make changes to the configuration of the web interface, you will need to stop the Peer Management Center Web Service in services.msc and use Notepad to modify the config.ini file located under PMC_INSTALL_FOLDER\Hub\web-configuration\ (where PMC_INSTALL_FOLDER represents the root installation directory of Peer Management Center). Once modifications are complete, save the file and restart the Peer Management Center Web Service. The important items to configure within this file are:
org.eclipse.equinox.http.jetty.http.enabled |
Set to "true" to enable HTTP access to the web interface. If set to "true", the org.eclipse.equinox.http.jetty.http.host and org.osgi.service.http.port items must also be configured in order to enable HTTP access to the web interface. If set to "false", HTTP access will be disabled and the other HTTP-related settings will be ignored. |
org.eclipse.equinox.http.jetty.http.host |
Set this to the hostname or IP address via which the web interface can be accessed using HTTP. Set this to "localhost" to enable local access only for HTTP. |
org.osgi.service.http.port |
Set this to the port to be used for HTTP access. |
org.eclipse.equinox.http.jetty.https.enabled |
Set to "true" to enable HTTPS access to the web interface. If set to "true", the org.eclipse.equinox.http.jetty.https.host and org.osgi.service.http.port.secure items must also be configured in order to enable HTTPS access to the web interface. If set to "false", HTTPS access will be disabled and the other HTTPS-related settings will be ignored. |
org.eclipse.equinox.http.jetty.https.host |
Set this to the hostname or IP address via which the web interface can be accessed using HTTPS. Set this to "localhost" to enable local access only for HTTPS. |
org.osgi.service.http.port.secure |
Set this to the port to be used for HTTPS access. |
IMPORTANT NOTES FOR THE CONFIG.INI FILE:
•All settings listed above must be followed by an "=" and a value. For example, to enable HTTP access, the line in the config.ini file with org.eclipse.equinox.http.jetty.http.enabled should look like:
org.eclipse.equinox.http.jetty.http.enabled=true
•HTTP and HTTPS are configured independently of one another in the config.ini file and as such, can be set to different modes. For example, HTTPS could be configured in a public mode, while HTTP is set to private ("localhost").
•DO NOT modify any other settings in the config.ini. Doing so may result in the inability of the web interface to start.
•Duplicate entries in the config.ini file may also result in the inability of the web interface to start.
Once Peer Management Center has been installed and all services have been started, open up a web browser and enter the following URL: http://localhost:8081. Please note that the exact URL will vary depending on the settings you have selected in the How To Set Up section above (for example: http vs https, appropriate hostname or IP, and appropriate port). In the page that loads, select the Peer Management Center Portal link. The following page will then be displayed:
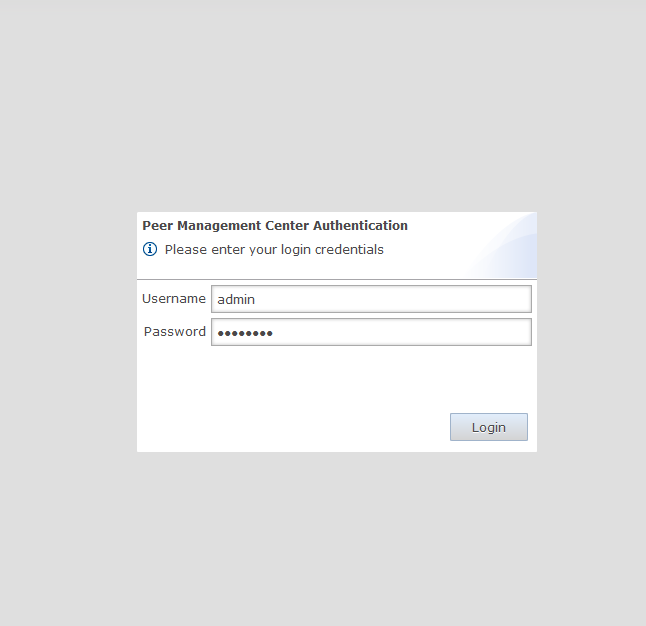
The default user name is "admin" with a default password of "password". We highly recommend that you change this password. See the User Management section for more information on changing account passwords.
If logged in with an admin account, the following will be displayed:
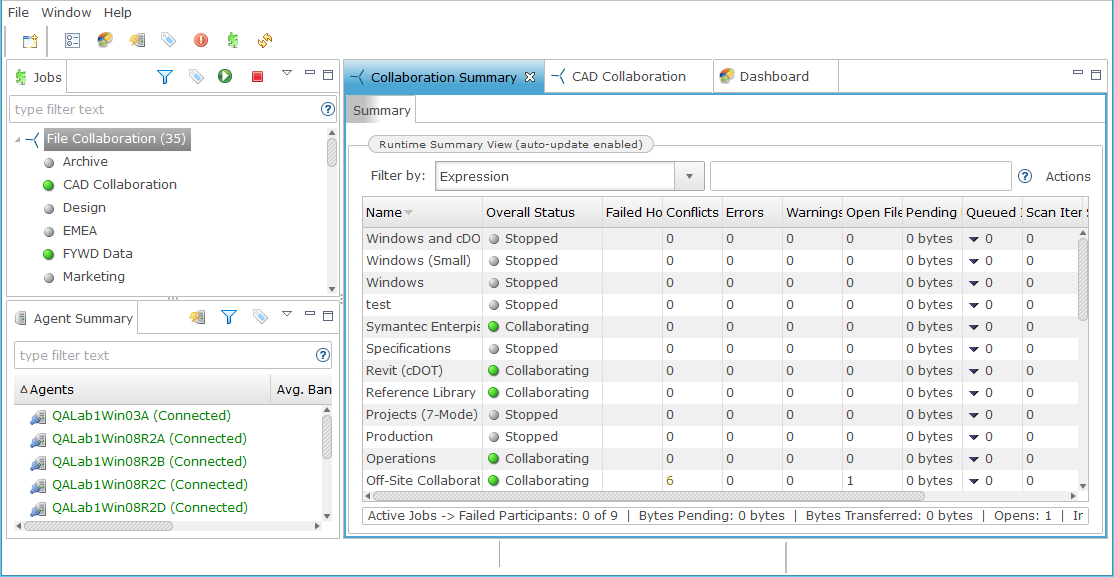
As mentioned above, those with admin accounts will have complete access to the Peer Management Center's UI. For more details on how to use the full Peer Management Center interface, please see the Main View section of this help document.
Those with helpdesk accounts are limited to read-only access of the following:
•The Job View
•The Collaboration Summary view
•The Summary and Session tabs of each job.
In addition, these accounts have read-write access to the File Conflicts tab of each job, with the ability to release conflicts.
There are several important things to keep in mind when it comes to securing access to Peer Management Center's web interface:
•The default admin account password should be changed immediately. For details, see the User Management section below.
•Access to the web interface can be in the form of both HTTP and HTTPS. The latter will ensure that all communication between the client browser and the service hosting the web interface is encrypted. Regardless of which is enabled, the hostname or IP address through which clients can reach the web interface can be configured to limit access. See How to Set Up section for more details.
•While HTTPS access to the web interface is secured out of the box with a built-in certificate, this certificate can be swapped for a custom one. For more details on this process, please contact Peer Software's support team via email: support@peersoftware.com.