Prerequisites
For NetApp 7-Mode environments, the following up to date prerequisites document must be met in addition to the standard Peer Management Center Environmental Requirements: https://kb.peersoftware.com/tb/netapp-7-mode-prerequisites
For NetApp cDOT environments, the following up to date prerequisites document must be met in addition to the standard Peer Management Center Environmental Requirements: https://kb.peersoftware.com/tb/netapp-cdot-prerequisites
1.Review the prerequisites above before beginning the installation and configuration process.
2.Follow the general Peer Management Center installation steps that can be found here.
3.Launch the Peer Management Center Client.
Note: Before you can start the Peer Management Center interface/client, the Peer Management Center Service needs to be running. See the installation section for more information.
4.Install your license within the Peer Management Center. For more information, see the licensing section. You must contact our sales team to request a license which supports NetApp. Unless requested, all licenses that are issued do not include NetApp support by default.
5.Create a new file collaboration job. For more information, visit the section on creating a job.
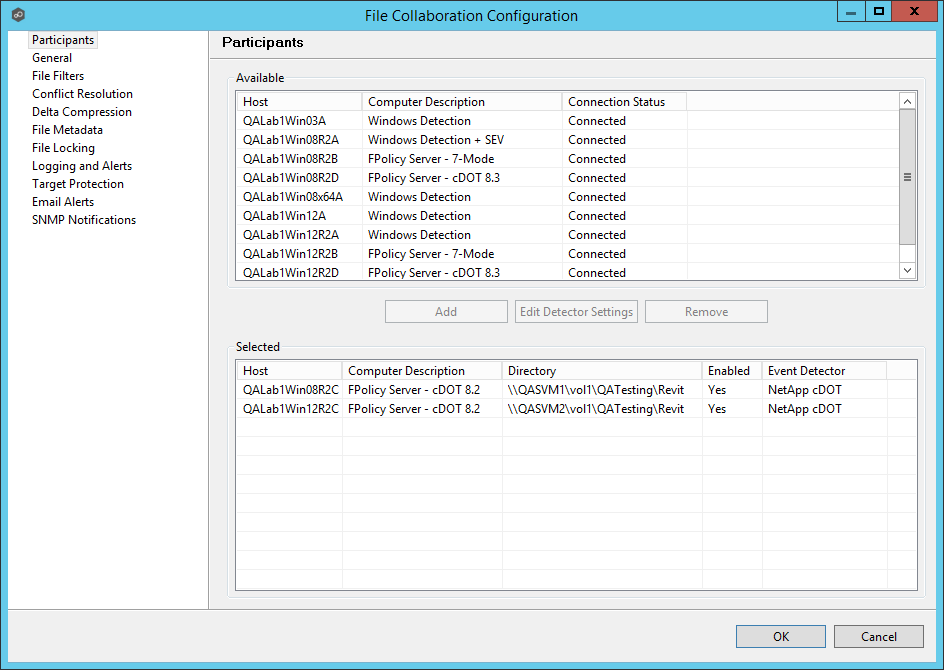
6.During the job configuration process, one or more participating hosts must be configured to interface with NetApp. To do so, view the Participants page of the File Collaboration Configuration dialog, and add the desired available host to the job. After the host is added to the job, enter the UNC path of the appropriate share on the NetApp device to the configured directory of the participant that is to act as a FPolicy Server. Then select NetApp 7-Mode or NetApp cDOT as the participant's configured Event Detector. This will depend on the edition of Data ONTAP that the NetApp is running. The example below shows an FPolicy Server working with a NetApp 7-Mode device.
7.As a result of the selection, a configuration dialog will be displayed requesting additional configuration for the FPolicy Server.
With NetApp 7-Mode devices, you can just press OK and exit the dialog.
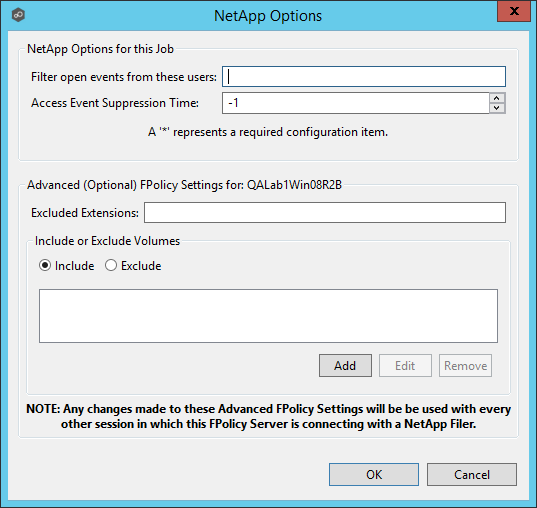
Some of the advanced optional settings for 7-Mode devices are as follows:
Filter open events from these users |
A comma-separated list of user names to exclude from access event detection. For example, if "USER1" is excluded, any access event activity generated by USER1 will be ignored, e.g. file is opened and closed. |
Access Event Suppression Time |
Represents number of seconds an open event will be delayed before being processed. Used to help reduce the amount of chatter generated by Windows 7 clients when mousing over files in Windows Explorer. The default vault is -1, which will use a globally set value. A value of 0 will allow for dynamic chanages to the amount of time an open event will be delayed based on the the load of the system. |
Excluded Extensions |
Extensions entered here are excluded from event detection on the NetApp Filer. Values are comma separated and must not contain any periods.
FPolicy enables you to restrict a policy to a certain list of file extensions by excluding extensions that need to be screened.
Note: The maximum length of a file name extension supported for screening is 260 characters. Screening by extensions is based only on the characters after the last period (.) in the file name. For example, for a file named fle1.txt.name.jpg, file access notification takes place only if a file policy is configured for the jpg extension |
Include or Exclude Volumes |
List all volumes on the NetApp Filer to exclude or include based on selected choice.
FPolicy enables you to restrict a policy to a certain list of volumes by including or excluding volumes that need to be screened.
Using the include list, you can request notifications for the specified volume list. Using the exclude list, you can request notifications for all volumes except the specified volume list. However, by default, both the include and exclude list are empty.
You can use the question mark (?) or asterisk (*) wildcard characters to specify the volume. The question mark (?) wildcard character stands for a single character. For example, entering vol? in a list of volumes that contain vol1, vol2, vol23, voll4, will result in only vol1 and vol2 being matched.
The asterisk (*) wildcard character stands for any number of characters that contain the specified string. Entering *test* in a list of volumes to exclude from file screening excludes all volumes that contain the string such as test_vol and vol_test. |
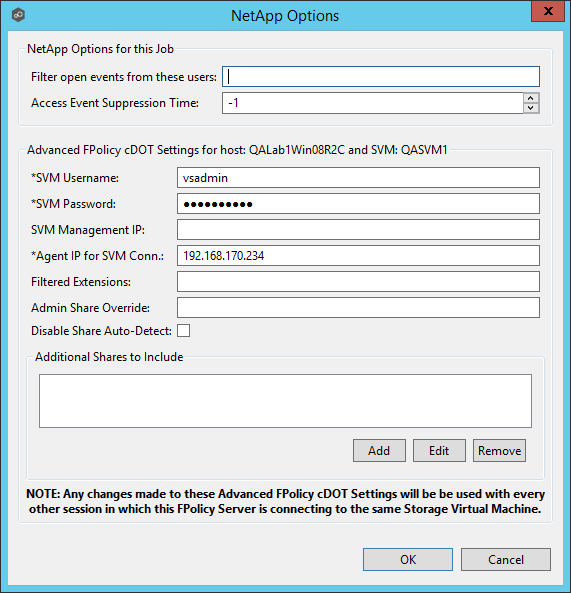
With NetApp cDOT devices, you must fill in the all non-optional settings shown in the table below the screenshot.
Filter open events from these users |
A comma-separated list of user names to exclude from access event detection. For example, if "USER1" is excluded, any access event activity generated by USER1 will be ignored, e.g. file is opened and closed. |
Access Event Suppression Time |
Represents number of seconds an open event will be delayed before being processed. Used to help reduce the amount of chatter generated by Windows 7 clients when mousing over files in Windows Explorer. The default vault is -1, which will use a globally set value. A value of 0 will allow for dynamic chanages to the amount of time an open event will be delayed based on the the load of the system. |
SVM Username |
The account name of the VSAdmin or similar account on the SVM that has the appropriate access to ONTAPI. |
SVM Password |
The password of the VSAdmin or similar account on the SVM that has the appropriate access to ONTAPI. This vaule will be encrypted. |
SVM Management IP (optional) |
If the primary data LIF for the SVM (whose IP address is registered in DNS) does not support management calls, please enter the management IP address of SVM here. |
Agent IP for SVM Conn. |
The IP address over which this Peer Agent will connect to the configured SVM. This MUST be an IP address. |
Filtered Extensions |
A comma separated list of file extensions to exclude (without a leading '*.') |
Admin Share Override |
Enter the administrative-type share that you created on the cDOT SVM. In order to take advantage of performance improvements when using this option, the share must be created at the root of the SVM's namespace (/). Ideally it should be named to something like PMCShare$ to prevent users from being able to see it. |
Disable Share Auto-Detect |
Disable the option to auto-detect shares and only use the shares defined in the Participants screen and the Additional Shares to Include option below. |
Additional Shares to Include |
Specify the shares on the SVM that users can use to access the data that Peer Management Center will be collaborating with. For example, if Peer Management Center is collaborating on data that resides under the Departments share with a local namespace path /departments, but users access data via shares to individual sub folders under the Departments folder (such as Marketing with a local namespace path of /departments/marketing and Sales with a local namespace path of /departments/sales). In this example, the list of shares would be Departments, Marketing, and Sales. |
Starting with v3.5.1, Peer Management Center adds a new performance optimization for cDOT environments. To take advantage of this new optimization, Admin Share Override, Disable Share Auto-Detect, and Additional Shares to Include all need to be configured. For more details and before making any changes, please contact Peer Support.
8.Once all participating hosts are configured with the appropriate NetApp paths and detectors, the file collaboration job may be saved and started.