|
<< Click to Display Table of Contents >> Step 1 - Host Participants and Directories |
  
|
|
<< Click to Display Table of Contents >> Step 1 - Host Participants and Directories |
|
Once global options have been configured, create a new file collaboration job by clicking on the Create New button in toolbar of the Peer Management Center, or by selecting the New menu item from the File menu. A drop down list of all installed Peerlet types will be displayed. Selecting the File Collaboration option will prompt you for a unique name for the job, then open the File Collaboration Configuration dialog..
The first page of configuration will be for Host Participants of the file collaboration job. On this page, you will select and configure which hosts will be participating in this job.
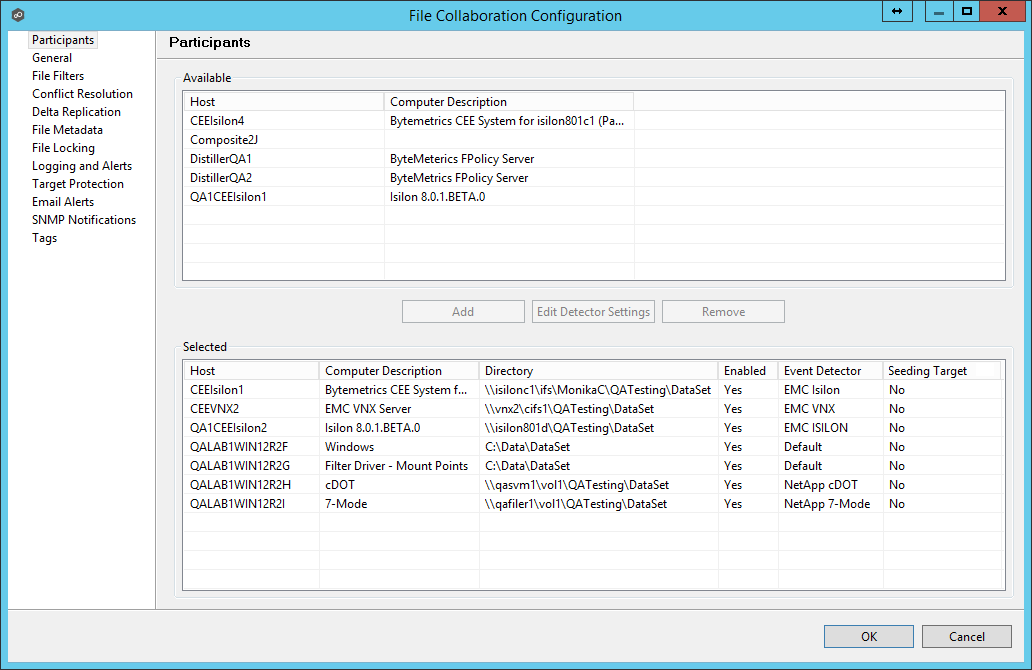
Participant configuration steps are as follows:
1.A list of all available hosts will appear in the Available table on the top of the page. Available hosts are any host with a Peer Agent installed that has successfully connected to the configured Peer Management Center Broker. The name that will be displayed is the computer name of the server that the Peer Agent is running on. If a particular host is not displayed in the list then try restarting the Peer Agent Windows Service on that host, and if it successfully connects to the Peer Management Center Broker, then the list will be updated with the computer name of that host.
NOTE: Computer Description is defined through Windows on a per-computer basis.
2.Select two or more hosts from the Available table and click on the Add button to add the hosts to the Selected table.
3.For each selected host you will need to type in the path to the Root Folder, and then press enter. The Root Folder for all hosts can be identical, or they can have different absolute path names based on your needs.
4.Optionally, if you would like to exclude real time events from certain users, this can be done by selecting the desired host in the Selected table and clicking Edit Detector Settings. This is helpful if you are trying to prevent events generated from backup and/or archival tools from triggering activity. Usernames should be separated by commas.
5.If you are properly licensed to and wish to include a NetApp storage device within a file collaboration job, additional configuration is required for each selected host that is to interface with a NetApp storage device via the NetApp FPolicy API. For more information, please review the NetApp Configuration section.
NOTE: From this point on, no other configuration items are mandatory. You can leave the rest of the configuration settings as their default values and move onto to Step 10 - Save Settings. If you wish to continue configuring the job, please continue to Step 2 - General Settings.
Seeding Target
Smart Data Seeding helps to efficiently integrate a host that has been disconnected for a long period of time or a new host into a File Collaboration job. Such existing hosts or new hosts with pre-seeded data (using methods like shipping a drive or server) should be set as Seeding Targets within a collaboration job. When the scan starts, non-Seeding Targets will become the masters and bring the Seeding Targets up to date. Stale updates, deletes, and renames will NOT be brought back from the Seeding Targets, nor will any local real-time activity. Once that initial scan is complete, the Seeding Targets will become full participants with real-time enabled. For more information on Smart Data Seeding and it's potential options, please contact support@peersoftware.com.