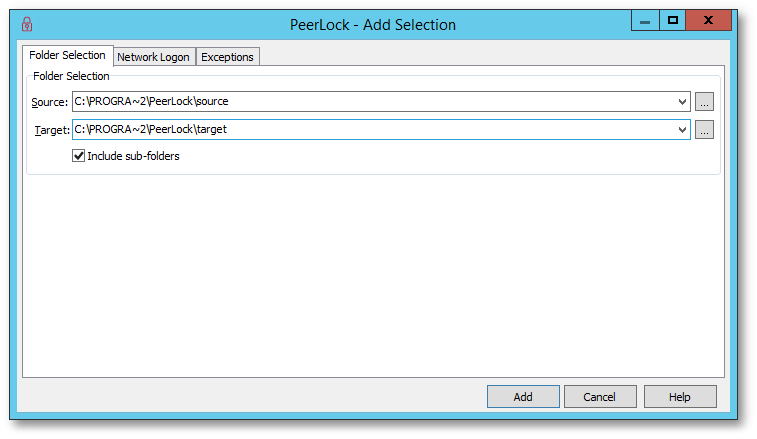
Add Selection Screen


Add Selection Screen |


|
|
PeerLock Help > Selection List > Add Selection Screen |

Folder Selection
This screen is used to add a new selection. By default this selection contains a source and target sub-folder of the installed folder with Include sub-folders enabled and a mask that includes all files. You can access this screen via the Action --> Selections --> Add menu item, by double clicking the <Double-Click Here to Add Selection> item in the Selection List, by right- clicking on the Selection List and selecting Add from the popup menu, or by clicking on the Add button located on the Selection List Status Bar. |
|
Source |
You may select a Source folder by typing the file path into the field provided, dragging and dropping from MS Windows Explorer into the field provided, or by using the Select Source Button to the right of this field. All source folder selections must reside on the local machine.
Click on the brows button to the right of this field to navigate to the desired Source directory: once this box has opened, locate your chosen Source folder, select it using the left mouse button, and click "OK", or by double-clicking the Source field. This selection requires that the machine on which PeerLock is running has full access to the desired source directory. |
Target |
You may select a Target folder by typing the file path into the field provided, dragging and dropping from MS Windows Explorer into the field provided, or by using the Select Target Button to the right of this filed. For multiple target selections use a semi-colon delimiter as depicted above.
For remote Target locations we recommend providing the UNC paths to the desired locations.
Click on the brows button to the right of this field to navigate to the desired Target directory: This button will display a 'Target Folder Selection' dialog that will allow you to add targets. To add a Target folder, click New, then type the desired Target folder into the field located at the bottom of the dialog, or you may use the browse for folder button. This button opens a "Browse for Folder" dialog box: once this box has opened, locate your chosen Target folder, select it using the left mouse button, and click "OK." Repeat this process for each desired target folder. Target folders can be deleted by selecting them from the list and clicking the Delete key at the bottom of the dialog box. Once you have finished, click the OK button. The dialog will close and all of the Target folders you have specified will automatically appear in the Target field in the proper format (separated by semi-colons).
This selection requires that the machine on which PeerSync is running has full access to the desired Target directory. In some instances Network Logon may be required. |
Include sub-folders |
Option to enable/disable the including of sub-folders of for the current selection. |
Notes:
1.Please refer to Product Editions for Selection Limits.
2.PeerLock allows for 255 Source Selections with each allowing for up to 100 Targets.
3.Folders can be dragged and dropped from MS Windows Explorer into these fields.
4.The drop-down lists will be dynamically populated with source-target folders, as they are set.
5.You can delete items from drop-down lists by dropping the list and selecting the item and pressing the delete key.
6.UNC names can be entered manually, or can be selected from the Network Neighborhood.
7.UNC names will appear in the form: \\COMPUTER\SHAREDDEVICE\PATH