Prerequisites
| 1. | The PeerLink Agent must be installed on a Windows server that will act as your fPolicy Server and will connect to your NetApp storage system to monitor and detect events. |
| 2. | It is recommended that the fPolicy Server be a Windows 2003 server. |
| 3. | Minimum supported ONTAP version is 7.3.5 |
| 4. | The fPolicy Server needs to be on the same subnet as the NetApp storage system. |
| 5. | The fPolicy Server and NetApp storage system should run on the same domain. |
| 6. | For optimal performance, the fPolicy Server should be a stand-alone server, separate from the PeerLink Hub and PeerLink Broker. |
| 7. | The Agent service account on all fPolicy Servers must be a Domain User with Domain Backup Operator privileges and must either be a Domain Administrator or be a member in the Local Admin Group on the NetApp Filer. You can add a domain user to the Local Admin Group of the Filer with the following ONTAP command (where domainUserName represents the user's account name): useradmin domainuser add domainUserName -g administrators Note: Only members of the Administrators or Server Operators local groups on the Filer can successfully execute the NetFileEnum function which is required for file collaboration. |
| 8. | The Windows Firewall needs to be disabled on the fPolicy Server. |
| 9. | DNS must be able to resolve the Fully Qualified Domain Name of each fPolicy Server. Both forward and reverse lookups must successfully resolve. |
| 10. | The following Local Security Policy settings must be set: |
| • | Network Access: Restrict anonymous access to Named Pipes and Shares >>> Disabled |
| • | Network access: Named Pipes that can be accessed anonymously >>> add ntapfprq and ntapfpcp. |
| • | Network Access: Let Everyone permissions apply to Anonymous users >>> Enabled |
| • | Microsoft Network Server: Digitally sign communication >>> Disabled |
| 11. | All Agent servers require ports 61617 and 8181 to be open for outgoing traffic (if a firewall blocks outgoing ports). |
| 12. | The server running the PeerLink Hub and PeerLink Broker requires incoming and outgoing ports 61617 and 8181 to be open for collaboration. |
For more information on configuring a file collaboration session, please see the Getting Started section.
| 1. | Download and run the PeerLink Hub and PeerLink Agent installers from our website: http://www.peersoftware.com/downloads/product_updates.aspx |
| 2. | Do not install over an existing installation. If applicable, uninstall the previous version first before installing a new one. Please see the NetApp Upgrades section for more information. |
| 3. | When installing the Agent on an fPolicy Server, please be sure to provide an administrative domain user account (preferably the "Administrator") for the service to run under. |
| 4. | Launch the PeerLink Hub interface/client. Note: Before you can start the PeerLink Hub interface/client, the PeerLink Hub Service needs to be running. See the installation section for more information. |
| 5. | Install your v2.1 license within the PeerLink Hub. For more information see the licensing section. You must contact our sales team to request a license which supports NetApp interaction. Unless requested, all licenses that are issued do not include NetApp support by default. |
| 6. | Create a new file collaboration job. For more information, visit the section on creating a job. |
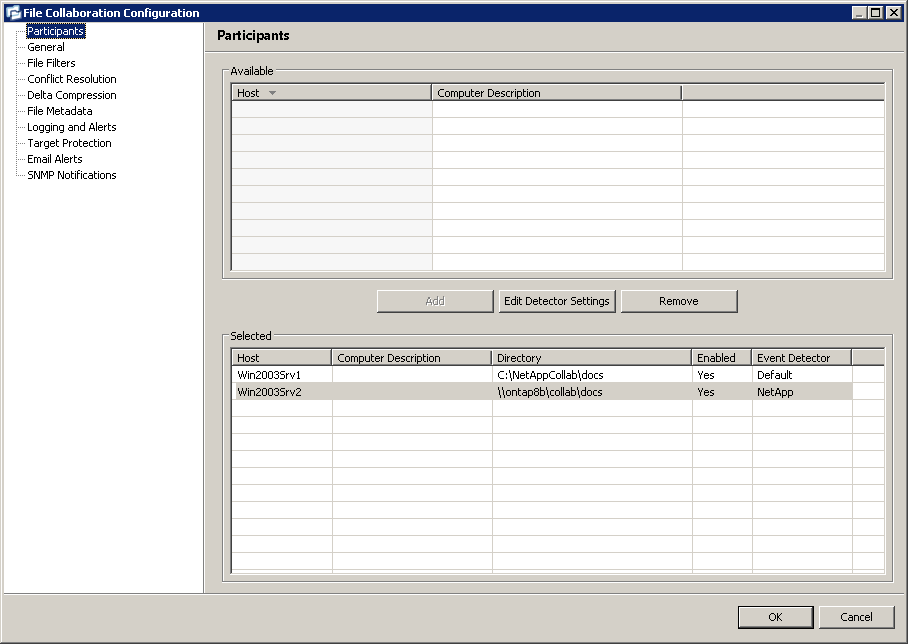
| 7. | During the job configuration process, one or more participating hosts must be configured to interface with NetApp. To do so, view the Participants page of the File Collaboration Configuration dialog, and add the desired available host to the job. After the host is added to the job, enter the UNC path of the appropriate share on the NetApp Filer to the configured directory of the participant that is to act as a fPolicy Server. Then select NetApp as the participant's configured Event Detector. An example is shown below. As a result of the selection, a configuration dialog will be displayed requesting additional configuration for the fPolicy Server. The only mandatory field is for the local path. The rest of the dialog represents Advanced fPolicy Configuration. |
Image 1
| 8. | In order for a file collaboration job to be able to detect files that are already opened, you will also need to provide the local mapping to the CIFS share on the NetApp device. This local mapping should not include any sub-folders for the root UNC path. This local path must be entered into the NetApp Options dialog for each participant (as highlighted in Step 7). An example is listed below. |
Example:
UNC path to NetApp Filer (shown in Image 1 above): \\ontap8b\collab\docs
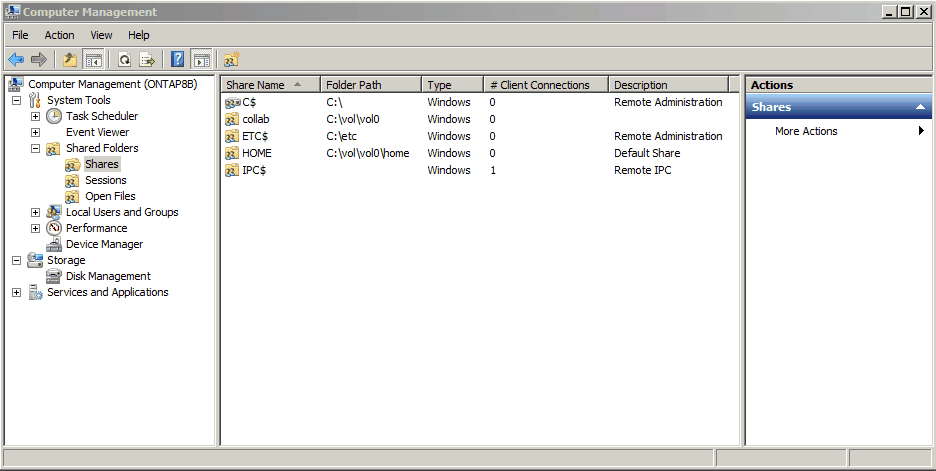
Local Path (obtained for share "collab" in Image 2 below): C:\vol\vol0\
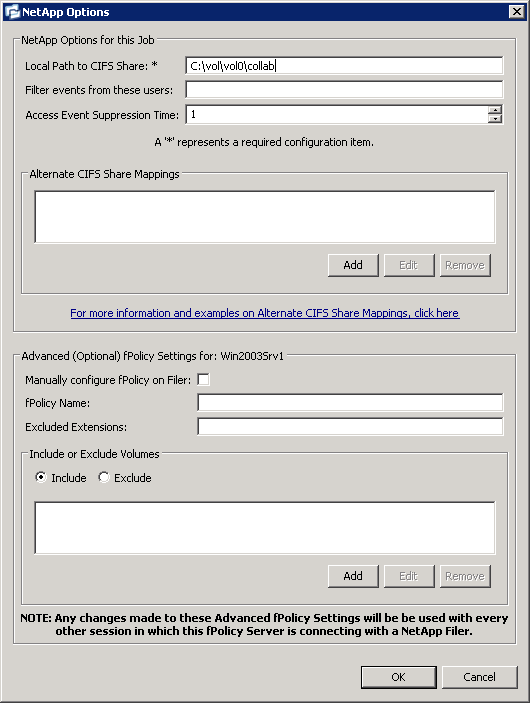
Value Entered in NetApp Options (Image 3 below): C:\vol\vol0\collab

Image 2

Image 3
| 9. | In addition to setting a local path, some additional host-specific NetApp configuration options are available (as shown in Image 3 above): |
Filter events from these users |
A comma-separated list of user account names from which events will be ignored. Ideal for filtering out events from backup and/or archival services by filtering on the username under which a backup and/or archival service is running. |
Access Event Suppression Time |
Represents how long an open event will be delayed before being processed. Used to help reduce the amount of real time chatter in several scenarios. The default value is 1 second. A value of 0 will allow for a dynamically changing amount of time that an open event will be delayed based on the load of the system. |
Alternate CIFS Share Mappings |
See below. |
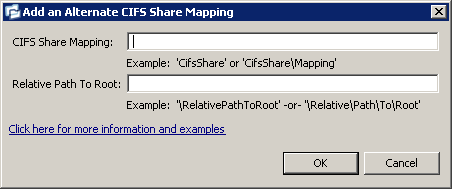
If your environment has alternate ways to access content in the configured root UNC folder, you need to specify any alternate CIFS share mappings. For each unique alternate CIFS share, you must provide a directory mapping relative to the primary UNC path configured for this job. Failure to identify all possible mappings through which a user may access files will result in change events being lost. As a result, files may get out of sync across hosts. The following image is an example of the dialog to add a mapping.

Image 4
For example, say your primary UNC path is \\serverName\departments$, which maps to local path \vol\vol0\departments. If you have another CIFS share called finance$ (or \\serverName\finance$) which maps to local path \vol\vol0\departments\finance, and users can use finance$ as a shortcut to access the finance folder under departments, then you need to create the following mapping:
CIFS Share Mapping: finance$
Relative Path To Root: \finance
Another example is where you have an alternate CIFS Share that maps to a parent folder of your primary configured UNC folder:
In this case, the primary UNC path \\serverName\departments$ maps to local path \vol\vol0\shares\departments, and you have an alternate CIFS share called shares$ (or \\serverName\shares$) which maps to local path \vol\vol0\shares. The share called shares$ is a parent of the primary watch folder (\\serverName\departments$). The following mapping would be needed:
CIFS Share Mapping: shares$\departments
Relative Path To Root: \
Another example is where you have an alternate CIFS Share that maps to the same folder as your primary configured UNC folder:
In this case, the primary UNC path is \\serverName\departments\sales$ which maps to local path \vol\vol0\departments\sales. The alternate CIFS share called salesTeam$ (or \\serverName\salesTeam$) also maps to local path '\vol\vol0\departments\sales'. The share called 'salesTeam$' represents the same local path as the primary watch folder ('\\serverName\departments\sales$'). The following mapping would be needed:
CIFS Share Mapping: salesTeam$
Relative Path To Root: \