Selection List Overview


Selection List Overview |
|
|
PeerLock Help > Selection List > Overview |
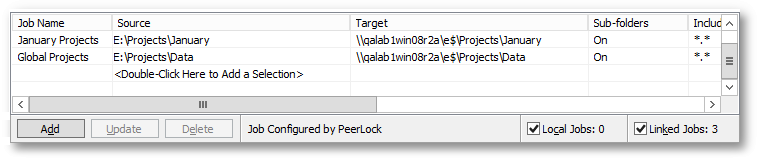
Selection List Columns
The columns displayed on this panel can be shown/hidden by choosing Column Selections... from the Selection List Popup Menu. You may also reposition the columns simply by dragging them to a desired position. The Selection List can be shown/hidden via the View menu. The default columns are Source, Target, and Sub-folders. |
|
Source |
Displays the folder that you wish to monitor for files that are opened. |
Target |
Shows the folder or a list of folders where the files that you wish to be locked upon a source file open reside. |
Sub-folders |
Displays the option to watch just the root of the folder (Off) or to include sub-folders of your Source and Target selection (On). |
Include |
Shows the masking of the types of files you wish to include. File types are specified by a star command followed by the file extension (i.e. *.doc;*.txt, etc.). The default setting ( * ) includes all files. Multiple Inclusions will be semi-colon delimited. Inclusions are not case sensitive, i.e. A = a. |
Exclude |
Shows the masking of the types of files you wish to exclude. File types are specified by a star command followed by the file extension (i.e. *.doc;*.txt, etc.). Multiple Exclusions will be semi-colon delimited. Exclusions are not case sensitive, i.e. A = a. |
Source Connect As |
Displays the username (if any) specified to allow PeerLock connection to the source directory that is not accessible using the current logged on account. |
Target Connect As |
Displays the username (if any) specified to allow PeerLock connection to the target directory that is not accessible using the current logged on account. |
Notes:
| 1. | Please refer to Product Editions for Selection Limits. |
| 2. | PeerLock allows for 255 Source Selections with each allowing for up to 100 Targets. |
| 3. | Folders can be dragged and dropped from MS Windows Explorer into these fields. |
| 4. | The drop-down lists will be dynamically populated with source-target folders, as they are set. |
| 5. | You can delete items from drop-down lists by dropping the list and selecting the item and pressing the delete key. |
| 6. | UNC names can be entered manually, or can be selected from the Network Neighborhood. |
| 7. | UNC names will appear in the form: \\COMPUTER\SHAREDDEVICE\PATH |